
Building Your First AR-15: Step-by-Step DIY Guide | AmmoJo.com
Posted by Ammojo on Jun 23rd 2025
Building Your First AR-15 is a comprehensive step-by-step manual for legally assembling an AR-15 rifle using commercially available parts. This guide is structured for three experience tiers – Beginner, Intermediate, and Expert – with detailed instructions, diagrams, checklists, real-world build examples, best practices, and safety tips at each level. Whether you’re a first-time builder or a seasoned gunsmith, this eBook will help you build a reliable AR-15 while staying safe and compliant with the law.
Introduction
Building an AR-15 is an engaging way to understand your firearm inside and out. At its core, the AR-15 is a modular, semi-automatic rifle comprised of two main sections: the upper receiver and the lower receiver. Each section contains various components that together make a functioning firearm. In this introduction, we’ll cover AR-15 basics, the tools you’ll need, and how this guide is organized. We’ll also touch on safety and legal considerations before you start your build.
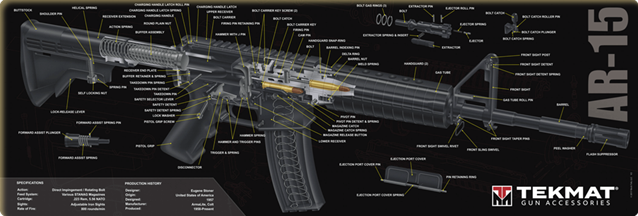
Overview of AR-15 Components. This diagram labels major parts of an AR-15, including the upper receiver group (barrel, handguard, bolt carrier group, charging handle, forward assist, etc.) and the lower receiver group (trigger, pistol grip, magazine well, stock, buffer tube, etc.
Understanding these parts is crucial before assembly.
AR-15 Basics
The AR-15 rifle is often called a “platform” because of its modularity and vast options for customization. It operates on a direct impingement gas system, meaning gas from a fired cartridge is siphoned from the barrel through a gas tube to cycle the action (more on gas systems in a dedicated chapter). The rifle is divided into two primary assemblies:
- Lower Receiver Group: The serialized part of the firearm (legally the “firearm” itself) housing the trigger mechanism (fire control group), magazine well, and buttstock. It’s often called the “brain” of the rifle because it contains the trigger and controls. The lower receiver interfaces with parts like the trigger, magazine catch, bolt catch, safety selector, pistol grip, and stock.
- Upper Receiver Group: The upper portion houses the bolt carrier group (the “heart” of the rifle) and the barrel, and it attaches to the lower via two pins. The upper receiver group includes the bolt carrier and bolt (which chamber, fire, and eject rounds), the charging handle for manual cycling, the barrel, and its components (gas block, gas tube, muzzle device), handguards, and sights or optics.
Each part of the AR-15 can be purchased separately and assembled, which is why building one is feasible for enthusiasts. Be aware that the lower receiver (even as a stripped part) is legally considered a firearm, so it must be transferred through the proper legal channels (FFL) with a serial number. All other parts can usually be bought freely online or in stores, but certain configurations may be restricted by state laws (discussed in the Legal Appendix).
Tools and Workspace
Before diving in, gather the necessary tools and prepare a safe workspace. Building an AR-15 requires only common hand tools and a few specialized armorer tools to make the job easier:
- Work Surface: A sturdy table or bench with good lighting. Consider using a gun vise or blocks to hold the receivers steady during work.
- Safety Gear: Safety glasses (especially important during spring-loaded parts installation), and ideally ear protection if you’ll be doing functions checks with snap caps or dry firing.
- Basic Hand Tools: A set of brass or steel punches (for tapping in small pins), a small hammer (with plastic or rubber head to avoid marring finishes), a set of hex keys/Allen wrenches, and a flat-head screwdriver. Many AR-15 parts use hex screws or small pins.
- Needle-nose pliers or tweezers: Helpful for holding tiny springs and detents.
- Masking tape: Can protect the receiver from scratches when pounding in pins (taping around the pin holes).
- Torque Wrench: Recommended for tightening the barrel nut and possibly the muzzle device to specified torque. A torque wrench ensures you don’t under- or over-tighten critical components.
- Armorer’s Wrench (Combo Tool): A specialized multi-tool for AR-15 that usually includes a barrel nut wrench, castle nut wrench for the buffer tube, and other functions. This is very useful especially for the upper receiver assembly and installing the buffer tube.
- Vise and Receiver Blocks: While not strictly required for a basic build, a bench vise with vise blocks (plastic inserts) for the upper and lower receiver can greatly help by securing the firearm while torquing parts (like the barrel nut or muzzle device). For beginners without a vise, it’s still possible to assemble using careful manual pressure and support, but a vise is strongly recommended for the upper assembly.
- Castle Nut Wrench: If not included in your armorer’s tool, you’ll need a wrench for the castle nut (the nut that locks down the buffer tube). Most combo tools have this.
- Roll Pin Holders/Starter Punches: These are optional specialized tools that hold small roll pins to get them started straight. Beginners may find these very helpful for frustrating pins like the bolt catch pin.
- Clevis pin or “Pivot Pin Tool”: A simple clevis pin or dedicated tool can help install the front takedown pin detent without launching it across the room (a common beginner headache).
- C-Clamp (small): Handy for compressing the trigger guard ears when installing the trigger guard roll pin to prevent slipping and causing the ear to snap off. A 4-inch C-clamp is suggested.
- Utility Knife: Useful for certain tricks like using the razor blade method to hold down the pivot pin detent when installing it.
Parts & Components Needed: In the chapters that follow, each section will detail the specific parts needed for that assembly (lower parts, upper parts, etc.) along with a checklist. At a high level, a complete AR-15 build will require:
- A Stripped Lower Receiver (the serialized frame) and a Lower Parts Kit (LPK) containing all internal lower parts (trigger, hammer, springs, pins, magazine catch, bolt catch, etc.).
- A Buffer Assembly (buffer tube, buffer spring, buffer weight, and receiver end plate & castle nut) and a Stock (buttstock that fits your buffer tube, either mil-spec or commercial spec tube).
- A Stripped Upper Receiver and Upper Parts (ejection port cover, forward assist assembly).
- A Barrel, Gas Block, and Gas Tube of appropriate length for the barrel.
- A Bolt Carrier Group (BCG) and Charging Handle.
- A Handguard (fore-end rail or grips) that is compatible with your barrel mounting (either fits a standard barrel nut or a proprietary system if you use a certain free-float handguard).
- Muzzle Device (flash hider, muzzle brake, or compensator) and a crush washer or shims for timing it.
- Sights/Optics and any desired accessories (grips, slings, lights, etc.).
Don’t worry if this seems like a lot – we will break down each of these in their respective chapters. Also note that you can buy some of these parts pre-assembled (for example, many first-timers buy a complete upper receiver that has the barrel, gas system, and handguard already assembled, which can simplify the build). However, this guide will teach you how to assemble everything from scratch for maximum learning.
Safety Notes
Always practice safety when working on firearms. Before working on any gun or component, ensure it is unloaded and no ammunition is present in the workspace. When you eventually test-fire your AR-15, follow all gun safety rules. During assembly, some parts like springs are under tension and can fly out – wear eye protection. Keep track of small parts (a magnetic tray or small containers help so you don’t lose springs/detents).
After assembly, always perform a thorough function check in a safe environment with the firearm unloaded. We will cover function checks in the troubleshooting chapter. This ensures the rifle operates correctly (trigger resets, safety engages, magazine locks, bolt cycles, etc.) before any live firing.
Legal Considerations (Brief Overview)
Building an AR-15 is legal for most U.S. civilians federally, but you must use a serialized lower receiver (unless you comply with regulations for manufacturing one privately, which is beyond our scope). All parts used must be legal – no full-auto components or anything that would make the firearm illegal. We will include a detailed Legal Appendix at the end with state-by-state restrictions because many states have specific laws (for example, bans on certain features or magazine capacities). Make sure you read that section and understand your local laws before building. For instance, some states like California, New York, New Jersey, etc., have assault weapon bans that may prohibit a standard AR-15 configuration, requiring modification (like fixed magazines or featureless builds). Other states may allow possession of AR-15s but have magazine capacity limits (e.g., 10-round limits) or require a license. We’ll cover these in the appendix.
One federal consideration: if you plan a short-barreled rifle (SBR) (barrel <16"), that falls under the NFA (National Firearms Act) and requires a tax stamp and paperwork before you build. This guide assumes a 16" or longer barrel for a rifle. You can legally build an AR-15 pistol (barrel <16" but without a stock – using a pistol brace if allowed, or bare buffer tube) without a tax stamp, but many areas have changing laws on pistol braces. For simplicity, we focus on rifle builds (16"+ barrels with a stock). If you do choose a barrel shorter than 16", you must either register it as an SBR before building or build it as a pistol (no stock) – check all applicable laws. Generally, it’s easiest for a first build to stick with a 16" or 18" barrel to avoid these issues.
Now that you have an overview, let’s dive into the build process chapter by chapter. Each chapter is organized by component group (lower receiver, upper receiver, etc.) and subdivided into Beginner, Intermediate, and Expert sections. The Beginner sections assume this is your first build and you are using mostly standard parts with minimal modifications. Intermediate sections introduce upgrades or alternative methods to enhance your build once you have basic experience. Expert sections delve into advanced techniques and fine-tuning (for accuracy, high-end performance, or custom configurations). Feel free to follow the level that matches your comfort and read the others to learn more. Even if you’re a beginner, reading the Expert tips will give you insight into what’s possible as you gain skill.
Throughout the guide, we’ll also provide real-world examples of parts choices for budget, mid-tier, and premium builds. These examples illustrate how a build can be done economically versus a no-expense-spared approach, and what trade-offs come with each. Look for the “Build Example” callouts in each chapter for these comparisons.
Let’s get started with the foundation of your rifle – the Lower Receiver Assembly.
Lower Receiver Assembly
The lower receiver is the serialized core of the AR-15. It’s a frame that houses the trigger and firing mechanism, controls (safety selector, magazine release, bolt catch), and supports the stock and buffer system. This section will guide you through assembling a stripped lower receiver with a lower parts kit and attaching the buffer tube and stock. We’ll cover three skill levels:
- Beginner: Basic assembly using a standard lower parts kit and mil-spec components.
- Intermediate: Installing enhanced parts like an upgraded trigger, ambidextrous controls, or anti-roll pins.
- Expert: Advanced lower work such as tuning trigger pull, installing a drop-in match trigger, or fitting an 80% lower (if legally allowed in your area), as well as tips for improved reliability and performance.
But first, let’s gather what we need.
Parts and Tools Checklist – Lower Receiver
Parts Needed:
- Stripped Lower Receiver: This can be made of forged aluminum (most common), billet, or polymer. For beginners, a standard forged lower (e.g., from Anderson, Aero Precision, PSA, etc.) is cost-effective. Ensure it’s compatible with “mil-spec” parts. (Mil-spec is the military specification, and most AR-15 parts adhere to it, meaning cross-compatibility).
- Lower Parts Kit (LPK): A complete LPK includes the trigger, hammer, springs, pins, and all small parts to complete the lower. It often includes a pistol grip as well. Some LPKs come without trigger group if you plan to install an aftermarket trigger – so choose accordingly.
- Trigger Group: If you’re not using the stock trigger from the LPK, you’ll need a trigger kit. Beginners can use the included mil-spec trigger (typically ~5-8 lb. pull weight). Intermediate/Expert might have a drop-in trigger upgrade (like a Geissele, CMC, etc.).
- Buffer Kit: This includes the buffer tube (also called receiver extension), buffer spring, buffer weight, end plate, and castle nut. Choose a carbine buffer tube (typical for collapsible stocks) or an A2 rifle buffer tube (for fixed full-length stocks) depending on your stock. The buffer weight can be standard (3 oz carbine buffer) for starters.
- Stock: The buttstock that fits your buffer tube. For a carbine buffer tube, you’ll use an adjustable/collapsible stock. For example, a Magpul MOE or CTR stock is popular. For rifle tubes, an A2 fixed stock or Magpul PRS for precision. Beginners often choose a basic collapsible M4-style stock for versatility.
- Pistol Grip: Often included in LPK, but you can choose aftermarket grips for better ergonomics. (Magpul MOE, BCM Gunfighter, etc.)
- Optional Upgrades: Ambidextrous safety selector, extended magazine release, anti-rotation trigger pin sets, etc., if you desire (typically intermediate/expert territory).
Tools Needed:
- Punch set (1/16", 5/64", 3/32" sizes cover most AR roll pins).
- Small hammer or mallet.
- Needle-nose pliers (useful for springs/detents).
- Castle nut wrench (for tightening the buffer tube’s castle nut).
- Flathead screwdriver (for pistol grip screw, if slotted screw is used; some grips use an Allen head screw instead).
- Allen keys (if your grip screw or aftermarket parts use hex screws).
- Receiver vise block (optional but helpful to hold the lower, though many install the LPK with the lower just lying on a bench).
- Masking tape (to protect finish around pin holes).
- Intermediate/Expert tools: If installing certain upgrades: a torque wrench (for torquing the castle nut to spec ~40 ft-lbs.), a small file or sandpaper (if minor fitting of aftermarket parts is needed), and a trigger pull scale (if measuring trigger weight for tuning).
Now we’ll proceed to assembly. Safety Tip: As you assemble, small springs and detents (like the takedown pin detents or safety detent) can launch out and disappear. Work slowly, control springs with your finger or a tool, and wear eye protection.
Beginner: Lower Receiver Assembly Step-by-Step
Follow these steps to assemble a standard AR-15 lower receiver with a mil-spec lower parts kit:
- Prepare the Lower & Work Area: Secure the stripped lower receiver on your bench (use a vise block if available). Ensure you have all LPK components laid out. It helps to identify each part first. Refer to an exploded diagram of the AR-15 lower to recognize parts (trigger vs. hammer, springs, detents, etc.). See image below for a typical LPK layout.
Lower Parts Kit Components. A typical AR-15 lower parts kit includes the trigger and hammer (bottom left), disconnector, springs, pins, bolt catch, magazine catch, safety selector, detents, buffer retainer, etc. Keeping these organized will make assembly easier. (Candy not included!)
- Install the Magazine Catch: This is usually the easiest step and a good starting point. Locate the magazine catch button, the magazine catch shaft, and the magazine catch spring.
- Insert the magazine catch shaft (with threaded end) into the round hole on the right side of the receiver (above the trigger opening).
- On the left side, place the spring over the protruding shaft, then press the magazine catch button on top of the spring into the recess on the left side.
- While pressing the button in (so it’s below flush), rotate the magazine catch shaft clockwise (from the right side) to thread it into the button. Continue until the end of the shaft is flush with or slightly past the button face when the button is released.
- Function check: Press the mag catch button – the catch on the other side should retract. This will later hold the magazine. Tip: Beginners sometimes scratch the receiver here – protect the receiver with tape, and you can use a plastic pen to push the button deep so you can rotate the catch without scraping the receiver.
- Install the Bolt Catch: The bolt catch is the lever on the left side that locks the bolt open on an empty magazine. The bolt catch assembly has a small bolt catch spring, a plunger (bolt catch buffer), and the bolt catch lever itself with its roll pin.
- First, drop the small spring into the hole on the left side of the receiver by the magazine well (just below the catch’s pivot point). Then drop the tiny plunger on top of the spring (rounded end outwards).
- Place the bolt catch lever in position – align its hole with the holes in the receiver ears. Ensure the plunger and spring stay in their hole pressing against the catch.
- IMPORTANT: Tape around the area to prevent scratching the receiver. The bolt catch roll pin installs from front to rear (check your receiver’s holes; usually one side is slightly countersunk – start from that side).
- Use a roll pin holder or needle-nose pliers to start the roll pin into the hole. Gently tap it in with the hammer and punch until it goes through the catch’s hinge and is flush. Go slowly and ensure the catch moves freely and the pin doesn’t kink. This is one of the trickier steps – patience is key. If it’s very tight, some builders use specialized tools or even channel-lock pliers with tape to press the pin in.
- Function check: press the top of the bolt catch – it should spring back via the plunger spring.
- Install the Pivot Pin (Front Takedown Pin): The pivot pin is the larger of the two takedown pins and goes at the front of the receiver (just above the magazine area). It is retained by a tiny detent pin and spring from the front. This step is notorious for launching that tiny detent across the room.
- Locate the small hole on the front of the receiver (right side of the pivot pin lug). Insert the tiny spring into this hole first.
- Now comes the tricky part: the detent pin must be inserted and then captured by the pivot pin. One method: Use a razor blade or thin piece of metal to hold the detent in place. Push the detent into the hole on top of the spring (it will stick out a bit, under tension). While holding it down with the razor blade (covering the hole so the detent can’t pop out), slide the pivot pin in from left side partway. The pivot pin has a groove that will capture the detent. Align that groove with the detent’s path.
- When ready, push the pivot pin in, and remove the blade so the detent snaps into the groove. (Alternatively, some use a specialized pivot pin tool or even a 1/4" clevis pin with a hole to trap the detent, then rotate to swap in the actual pin.)
- If done correctly, the pivot pin will now be captured – it shouldn’t pull fully out. It should slide and click as the detent locks it when fully extended.
- Tip: Perform this operation in a large clear plastic bag or aim it into a towel so if the detent flies, you can find it.
- Install the Trigger Group: The fire control group includes the trigger, trigger spring, disconnector, disconnector spring, hammer, hammer spring, and the two trigger/hammer pins.
- Start with the trigger. Fit the small disconnector spring into the trigger (there’s a recess on the trigger’s top for it; the wider end of the spring goes in the trigger). Then place the disconnector on top of the trigger (the spring will push it up) – align the hole in the disconnector with the hole in the trigger.
- Orient the trigger spring on the trigger: the spring’s coils wrap around the trigger pivot area, with the legs of the spring pointing forward and down, resting on the trigger itself (so it will push the trigger upward when installed).
- Now insert the assembled trigger (with disconnector on top, held by your fingers) into the receiver’s trigger well. Align the trigger’s pin hole with the lower receiver holes. Push the trigger pin through the receiver and trigger assembly (some wiggling may be needed). It should go through the disconnector as well, locking it in place. You may gently tap it with a mallet. If holes aren’t aligned, use a small punch as a slave pin to line them up, then push it out with the real pin.
- Next, the hammer: the hammer spring should be installed on the hammer with its coils around the hammer pin area and the legs pointing backwards (toward the buttstock end). The spring’s legs will rest on top of the trigger pin when installed, providing tension.
- Cock the hammer spring legs back and insert the hammer into the receiver (it will be under tension wanting to spring up). Align the hammer’s holes with the receiver holes. Push the hammer pin through to secure it. This may also need some tapping. Ensure the J-pin (a little spring inside hammer) is oriented to hold the pin in place (usually not an issue with standard pins).
- Once both pins are in, function test the trigger group carefully: Hold the hammer with your thumb (so it doesn’t slam forward and damage the receiver). Cock the hammer, then ensure the safety is off and pull the trigger – the hammer should release (catch it with your thumb). With trigger still pressed, re-cock the hammer – it should be caught by the disconnector (not fly forward). When you release the trigger, the hammer should drop from disconnector to be caught by trigger sear (you’ll hear a click – that’s trigger reset). This is the basic trigger function check. Always catch the hammer; do not let it strike the receiver without the upper in place.
- Install the safety selector: Actually, this can be done before the hammer if you prefer. To install the safety, the hammer must be cocked (so it’s out of the way). Simply insert the safety selector lever from the left side of the receiver into its hole (pointing to “fire” position as you insert). It will slide through the trigger area (the trigger must be installed to put it in, otherwise the safety won’t go in – if needed, squeeze the trigger a bit to align). Once through, leave it in “safe” for now (pointing forward).
- On the right side of the receiver, if you have an ambidextrous safety, install the right lever per its instructions (usually a tiny screw). Otherwise, a standard safety has just the one lever.
- Now install the pistol grip: The grip not only provides a handle; it also retains the safety selector spring and detent. Take the tiny safety detent pin (often brass-colored) and drop it into the small hole just behind the trigger, under the safety lever; the pointed end goes upward into the groove on the safety selector. Then the safety detent spring goes into the hole in the pistol grip (usually a hole on top of the grip).
- Carefully align the grip to the receiver, making sure the spring goes into the hole and pushes on the detent. Push the grip fully into place. The spring should now be putting pressure on the detent against the safety selector.
- Secure the grip with the provided screw (up through the bottom of the grip into the receiver). Tighten it snug (not over-tight – if it’s a screw into aluminum, you don’t want to strip it). Typically, either a flathead or hex screw.
- Check the safety: it should now click between Safe and Fire positions with detent resistance. On “Safe,” the trigger should not release the hammer; on “Fire,” it should. Do this check again catching the hammer safely. Never let the hammer strike freely without the upper.
- Install the Buffer Retainer and Spring: Before the buffer tube goes on, install the small buffer retainer pin and its spring. These keep the buffer from flying out when the upper is opened.
- Locate the small hole at the rear of the lower (in the threaded area for the buffer tube). Place the buffer retainer spring in the hole, then the buffer retainer pin on top (small plunger with a rounded top). This will later be captured by the buffer tube as you thread it in.
- Attach the Buffer Tube and Stock: Now you’ll assemble the buffer system onto the lower:
- Thread the castle nut onto the buffer tube (notches toward the receiver). Slip the end plate onto the tube (concave side facing the receiver).
- Begin threading the buffer tube into the back of the receiver by hand. As it gets close to the buffer retainer, you want the tube to capture the retainer pin’s lip. Push down the buffer retainer pin and continue threading the tube just enough to hold the pin in place (the pin’s top should stick out, but the tube edge prevents it from popping out).
- Ensure the end plate is flush against the rear of the receiver but note the takedown pin spring and detent: The rear takedown pin (the smaller pin at the back that holds the receivers together) also has a spring and detent, similar to the front one, but these install from the rear.
- Insert the rear takedown pin now if not already in (it goes through the two holes at the back of the receiver, the flat groove on the pin facing toward the buttstock). Put its detent pin in the little hole at the back of the receiver (just above the buffer tube area on the right side).
- Now when you align the end plate to the receiver, there is a small hole in the end plate that the takedown pin spring sits in. Place the spring in the hole on the end plate, then carefully swivel the end plate in while compressing that spring into the receiver’s channel.
- With the end plate in and the spring captured (held in its hole pressing on the detent), thread the castle nut down to snug the end plate against the receiver.
- Using the castle nut wrench, tighten the castle nut to secure the end plate. Proper torque spec is about 40 ft-lbs. (very snug). For a beginner build without a torque wrench, make it tight and ensure the end plate’s tabs align with the castle nut notches.
- (Expert note: Many builders also stake the castle nut – that is, deform a bit of metal from the end plate into the castle nut notch – to prevent it from loosening. This is military practice. As a beginner, you might skip staking, but do occasionally check the nut for tightness or use a bit of thread locker if not staking.)
- Now insert the buffer spring into the buffer tube from the rear, followed by the buffer itself. Push the buffer in until the buffer retainer pin pops up to lock it. The buffer should now be held in place by that retainer.
- Finally, slide your chosen stock onto the buffer tube. If it’s a collapsible stock, you typically pull down on the adjustment lever to slide it fully on past the retention pin, then let it engage the holes. If it’s an A2 fixed stock, you would have used a different receiver extension; for collapsibles, assume carbine stock. For example, the Magpul MOE-SL stock recommended by many has a strong lock-up and simply slides on and locks in place.
- Adjust the stock to ensure it locks and moves properly.
- Final Lower Checks: Double-check that:
- The safety operates (cannot fire on Safe).
- The magazine catch holds a magazine (you can use an empty magazine to test insertion and release).
- The bolt catch can be pressed and springs back (you can simulate by pressing it while pulling the top of the receiver as if a bolt would press it).
- The takedown pins slide in/out correctly (they should not fall out due to the detents).
- The trigger and hammer function as described in step 5’s function test (do one more dry fire test on Safe/Fire).
- The buffer and action spring move (press the buffer retainer to release the buffer – it should spring out a bit, but not fly because the spring is long; then push it back in).
Congratulations, you have a fully assembled AR-15 lower receiver! For a first-timer, this is a satisfying accomplishment. It’s often said the lower is the “easy half” of the build, but take pride in doing it correctly. A reliable lower with a decent trigger is the foundation for good shooting.
Intermediate: Enhanced Lower Builds
If you have some experience or want to incorporate upgrades into your lower, consider these intermediate-level enhancements and their installation notes:
- Upgraded Trigger: Installing an aftermarket trigger can greatly improve your AR’s feel. Options include drop-in triggers (self-contained units from companies like CMC, Rise, etc.) or component triggers like the Geissele SSA/E two-stage triggers. Many drop-in triggers simply slot into the trigger area and use the same pins (or proprietary pins) to secure. Follow the manufacturer’s instructions. For example, if you find a mil-spec trigger too heavy or gritty, a Geissele SSA-E provides a crisp break and is a popular premium choice. Intermediate builders can handle this as it usually doesn’t require fitting, just attention to safety (some come with adjustment screws – use thread locker if required so they don’t back out).
- Anti-walk Pins: Some triggers come with anti-walk or anti-rotation pin sets. These are pins that lock on both sides so they cannot drift out under rapid fire or vibration. Installation is simple – they replace your standard trigger/hammer pins and secure with small screws or plates. Use a bit of blue Loctite on the tiny screws so they stay put.
- Ambidextrous Safety Selector: If you’re left-handed or want ambi control, you can install an ambidextrous safety. This typically involves replacing the standard selector with an ambi one that comes in two pieces (one for each side, connecting via the center). Install is similar to the standard selector (often you insert one half, then screw on the other half from the opposite side). Ensure the detent and spring engage properly. Some ambi safeties allow changing between 90-degree throw or 60-degree short-throw – configure as you prefer, but note that using a short-throw may require a different detent or selector markings.
- Extended Controls: Intermediate builders might add an extended magazine release button (larger surface) – that simply screws onto the mag catch shaft after assembly (just depress mag catch and unscrew the old button, replace with new oversized one). Extended bolt catches (e.g., BAD lever) can attach to the standard bolt catch to allow dropping bolt from the trigger finger side – attach per instructions (usually a clamp-on piece).
- Enhanced Lower Parts: Some lower receivers (like the Aero M4E1 mentioned earlier) use threaded pins for the bolt catch and rear takedown pin detent, instead of roll pins. If you have such a lower, assembly is actually easier: you’d screw in the bolt catch pin with an Allen wrench instead of hammering a roll pin, etc. Always check if your receiver has any proprietary parts or methods. The guide above assumed a classic mil-spec pattern.
- Sling Attachment End Plate: Instead of a plain end plate, you can use one that has sling attachment points (like QD sockets or loops). Installation is the same, just replace the standard end plate. Be sure to orient any sling loop correctly (facing down or out as you prefer) before torquing the castle nut.
- Tuning Buffer Weight: A bit more advanced but intermediate builders sometimes choose a heavier buffer (H or H2, etc.) to slightly soften recoil or slow the cyclic rate. This can be beneficial if running a suppressor or a mid-length gas system, etc., but too heavy a buffer can cause reliability issues if the gas system isn’t providing enough force. As Aero’s guide suggests, unless you know your setup requires it, sticking to a standard carbine buffer initially is wise. You can always swap buffer weights later (it’s as simple as popping out the buffer and spring and inserting a new one).
- Grip Upgrades: Replacing the standard A2-style grip with something more ergonomic (Magpul MOE, BCM, Ergo, etc.) is very common. This is an easy swap – just unscrew the old grip and screw on the new, making sure the safety detent spring goes into the new grip’s hole. Choose a grip that fits your hand and shooting style; many have storage cores for spare parts or batteries as noted in Aero’s recommendation.
- Trigger Guard: If your lower receiver has a separate trigger guard (some have it built-in as part of the forging), you can swap the flat mil-spec guard for an extended or winter trigger guard (allows more room for gloved fingers). This is a small change but requires removing a roll pin at the front of the trigger guard. Use caution: support the ears of the receiver when punching that pin to avoid breaking them. Many aftermarket trigger guards (Magpul, etc.) include a set-screw for the rear and use the existing front pin or a replacement. Follow their instructions.
Best Practices & Tips (Intermediate): When upgrading parts, maintain compatibility – ensure your trigger pins are .154" mil-spec vs .170" (those larger were for older Colt lowers; almost all modern ones are .154"). Use a tiny dab of grease on trigger sear surfaces for smoother pull (don’t overdo it or the sear could collect debris). If installing a lighter trigger, function test rigorously – ensure the safety works and the disconnector properly catches the hammer during cycling, etc. If something seems off (hammer follows the bolt when you hold trigger – a dangerous condition), do not use the rifle until fixed. Most name-brand triggers will be safe if installed right.
Also, at intermediate level, you might apply some BLUE (medium) Loctite on screws like grip screw, selector lever screw, or castle nut if not staked, to prevent loosening over time – but do not use Red (permanent) as you want to be able to remove these parts if needed. And never Loctite the trigger/hammer pins in place; they should stay via their J-spring or anti-walk devices.
Expert: Advanced Lower Receiver Work
Expert-level work on the lower receiver involves fine-tuning and possibly non-standard builds. Here are some expert topics:
- Precision Trigger Tuning: Rather than buying a drop-in trigger, an expert might polish engagement surfaces of a mil-spec trigger to smooth it out (using very fine stone or polish compound). They might also adjust springs (or use reduced power spring kits) to lighten the pull. Caution: Stoning a sear is delicate – removing too much metal can make the trigger unsafe (prone to slam-fire or not holding at all). Only attempt if you truly understand trigger geometry, and always function test with dummy rounds before live fire. Often, it’s safer to buy a high-quality match trigger that’s been engineered for light pull. For ultimate triggers, brands like Geissele, LaRue MBT, TriggerTech, etc., are popular. Some competitive shooters even install adjustable triggers where you can set sear engagement and reset – these must be tuned carefully and secured with locking screws.
- Short Reset or Binary Triggers: (Legal note: Binary triggers – fire on pull and release – are legal in some states but not others, and the user must be extremely cautious as they mimic full-auto in some ways). Installing these is advanced and beyond our scope, but experts might consider them. Always check legality; for instance, some states explicitly prohibit binary triggers.
- Fitting an 80% Lower: An “80% lower” is an unfinished lower receiver that requires machining to become functional. Some expert builders use these to custom-build firearms without a serial (where legal). Completing an 80% lower involves drilling and milling the fire control cavity and holes – requiring a drill press or milling machine, jigs, and significant skill. It’s truly advanced DIY and nowadays heavily regulated in some jurisdictions (e.g., California requires serialization and registration of 80% builds). If you pursue this, ensure absolute compliance with all laws (we do not cover the milling process here).
- Advanced Lower Components: Perhaps you want to build a caliber conversion that needs different parts – e.g., 9mm AR that uses Colt or Glock magazines. These often require specific lower parts (mag blocks or a dedicated 9mm lower, different buffers, etc.). Or maybe a binary trigger or a custom selector with more than two positions. Experts should refer to specialized guides for these, but the principle of assembly is similar with some extra parts.
- Tighter Fit Upper/Lower: Some expert builders add an “accu-wedge” or tension screw to eliminate play between upper and lower. This doesn’t affect function but gives a tighter feel. Many high-end billet lowers have an adjustment screw in the grip area to push up on the upper for a snug fit.
- Enhanced Buffer System: For example, using a flat-wire spring or a hydraulic buffer for reduced recoil impulse. Installation is same as standard parts, but experts may choose these to fine-tune recoil feel.
- Full-Auto Systems (for licensed individuals): While beyond the scope of this civilian guide (and illegal without expensive licenses/tax stamps), an expert who is an SOT manufacturer might install auto-searers or burst kits. This requires significant modifications and legal paperwork – we mention it only academically. For 99.9% of builders, stick to semi-auto.
- Safety Enhancements: Experts often have a keen eye for safety. For example, verifying the trigger disconnector timing by examining wear patterns, ensuring the hammer and trigger pins rotate freely and don’t walk out under rapid fire (hence using anti-walk pins if needed), and even performing a drop test (unloaded firearm, cocked, on safe – drop from a few inches on a rubber mat to ensure hammer doesn’t drop). A well-tuned trigger can pass these tests.
Expert Best Practices: Always function test repeatedly after any custom tuning. If you stoned your trigger, test it with snap caps – smack the hammer while cocked (with your hand) to see if it slips. Switch the safety on/off, ensure it only fires when supposed to. Use a trigger pull gauge to ensure the pull weight isn’t dangerously light (many consider below ~3 lbs. too light for anything but benchrest use). If you’ve added ambi controls, make sure both sides work correctly (e.g., ambi mag releases shouldn’t drop the mag under recoil – test at range with a few rounds in mag, etc.).
One expert tip for improving a standard trigger without buying anything: a 5¢ trigger job often cited in forums is to dry-fire the trigger a couple hundred times (with snap cap) to let the sear surfaces mate, and/or use a tiny bit of polish on the sear – this can smooth a gritty trigger a bit. Another is using a set screw in the pistol grip screw hole to limit trigger overtravel (though again, advanced modification). Proceed with caution.
Lower Receiver Build Examples – Budget vs. Premium
- Budget Lower Example: You use an Anderson Manufacturing stripped lower ($50) with a basic lower parts kit from Anderson or PSA ($50-70). The mil-spec trigger is ~6.5 lb. pull, a bit gritty but serviceable. Standard M4 collapsible stock and A2 pistol grip (often included in kits) keep costs low. Total cost for the complete lower might be around $150. This basic lower will function fine; many thousands of ARs use these parts. The downside is a heavy trigger and no-frills controls. But it is effective – even stock triggers can achieve good accuracy in practical terms.
- Mid-Tier Lower Example: You opt for an Aero Precision M4E1 forged lower ($120) which has nice features like threaded pins (easier assembly). The lower parts kit you choose omits the trigger because you install a LaRue MBT-2S two-stage trigger ($100, known for excellent value). You add an ambi safety selector ($30) and an enhanced magazine catch and bolt catch (e.g. from Phase 5 or BAD, $50 total). The stock is a Magpul MOE SL (~$60) which is more ergonomic and solid-locking than the basic M4 stock. The grip is a Magpul MOE with storage ($20). Buffer is standard carbine but you use an H2 heavy buffer ($20) to pair with a mid-length gas system for softer recoil. This mid-range lower costs around $350 in parts. It offers a crisp ~4.5 lb. trigger, ambidextrous use, and improved furniture for comfort.
- Premium Lower Example: You use a billet machined lower from a high-end brand (e.g., Seekins Precision or ADM UIC, $250). The trigger is a Geissele SSA-E two-stage ($240) for a superb 3.5 lb. break. Controls are fully ambidextrous: ambi bolt release (built into some lowers or as an addon), ambi magazine release (Norgon or built-in), and a short-throw ambi safety (Radian Talon, $50). Anti-roll pins ($30) secure the trigger. The buffer tube might be a Vltor A5 system ($70) which uses a longer spring and buffer for a smoother impulse; paired with a Magpul PRS stock ($200) for precision shooting or a BCM Gunfighter stock ($60) for tactical use, depending on the rifle’s purpose. Every part is chosen for maximum durability and performance. Cost for this lower setup easily hits $700+. The result is a very smooth-shooting lower with an excellent trigger and fully ambidextrous manipulation – great for competition or duty use. The premium build’s main advantage is the trigger feel and slightly improved ergonomics; it won’t necessarily make the rifle more reliable than a budget build (even cheap lowers can be very reliable) but it can make it more comfortable and effective to operate at a high level.
Regardless of your budget, assembling the lower properly is crucial. Even a high-end trigger won’t help if the lower is put together incorrectly. But with this guide, you should have a rock-solid lower receiver ready to join an upper. Speaking of which, let’s move on to the Upper Receiver Assembly, where we’ll handle the barrel, bolt, and the “boom” side of the rifle.
Upper Receiver Assembly
The upper receiver assembly is the part of the AR-15 that contains the bolt carrier group (BCG), barrel, and other critical components for chambering, firing, and ejecting rounds. This chapter will cover assembling a stripped upper receiver into a complete upper, including the installation of the dust cover and forward assist, barrel and barrel extension, gas block and tube (though gas system specifics are in the next chapter, we’ll physically install them here), handguard, muzzle device, and finally inserting the BCG and charging handle. We will again break it down by skill level:
- Beginner: Many first-time builders may purchase a complete upper, which is fine – you can skip to the next chapter if so. But we’ll still explain the assembly. The beginner approach is assembling a basic upper with standard parts (16” barrel, fixed or low-profile gas block, standard handguard) using mostly drop-in components.
- Intermediate: Upgrading the upper with free-float handguards, better barrels, and understanding headspace checks and proper torque techniques. Possibly assembling upper for a specific purpose (e.g., longer barrel for precision, different calibers).
- Expert: Precision assembly tips such as lapping the receiver face for improved accuracy, using billet uppers, adjustable gas blocks (tuning), and ensuring perfect alignment for long-range accuracy. Also troubleshooting things like ensuring the barrel extension and feed ramps match the lower (e.g., M4 feed ramp cuts) and other advanced concerns.
Parts and Tools Checklist – Upper Receiver
Parts Needed:
- Stripped Upper Receiver: Choose one that matches your lower type (a standard mil-spec flat-top upper is most common). They often come with the forward assist and ejection port cover not installed – we’ll install them. If you got an upper that already has these installed, you can skip those steps. Some uppers are slick-sided (no forward assist or even no ejection port cover), which is fine if you prefer simplicity.
- Barrel: The barrel is the soul of the upper. Common length for general purpose is 16” (legal minimum without going NFA). Barrels come in various lengths (we’ll discuss gas length and performance in the Gas System chapter), profiles (thin, government, heavy), and rifling twists (e.g. 1:7 for heavier bullets, 1:8 or 1:9 for lighter, although 1:7 is a good all-around modern choice). Ensure the barrel comes with an installed barrel extension (most do) which has the locking lugs and feed ramps. Also, many barrels include a pre-drilled hole for the gas pin if using an A2 front sight base.
- Barrel Nut: This might come with your handguard if you are using a free-float handguard system, or if you’re using a standard delta-ring assembly for traditional handguards, it’s a specific type. The barrel nut is what secures the barrel to the upper receiver. Different handguards (free float tubes) often have proprietary barrel nuts.
- Handguard: Either a standard two-piece drop-in handguard (requires a delta ring assembly, often not used in custom builds) or a free-float handguard (KeyMod/M-LOK rails, etc.). Free-float is popular as it can improve accuracy by not binding the barrel and offers more accessory mounting. Ensure your handguard is the correct length to cover the gas system (e.g., a 9” handguard for carbine length gas, 12” for mid-length, etc., or longer if you want it to extend over a low-profile gas block).
- Gas Block & Gas Tube: The gas block attaches to the barrel over the gas port. It can be the traditional A2 front sight base (also serving as a sight), or a low-profile gas block for use under free-float handguards. The gas tube connects the gas block to the upper receiver’s gas key on the BCG. You must use the correct gas tube length (pistol, carbine, mid, rifle) corresponding to your barrel’s gas port position. Gas blocks often come with the appropriate roll pin for securing the tube. Also, note the diameter: most AR-15 barrels are 0.750” at the gas block journal, but some are 0.625” (pencil barrels) or 0.936” (bull barrels) – get the right size gas block.
- Muzzle Device: A flash hider, muzzle brake, or compensator to attach to the muzzle threads (most barrels are threaded 1/2x28 for .223/5.56 barrels). A common default is an A2 flash suppressor. These usually require a crush washer or shims to index correctly.
- Bolt Carrier Group (BCG): The BCG includes the bolt (with lugs that lock into the barrel extension), carrier, gas key (on top), firing pin, cam pin, and retaining pin. You can buy these assembled. Ensure it’s a quality BCG, properly staked gas key screws (they should be staked to prevent loosening) – reputable brands include BCM, Colt, Toolcraft, etc. A bolt should ideally be head-spaced to the barrel – if you mix and match, it’s fine if both are within spec. We’ll talk headspace in intermediate/expert sections.
- Charging Handle: Standard or ambidextrous. It slides into the upper and interfaces with the BCG to charge the weapon.
- Forward Assist assembly: (If your upper uses one) Consists of the forward assist pawl, spring, and roll pin. Often sold as a kit.
- Ejection Port Cover assembly: Includes the dust cover door, hinge rod, spring, and C-clip. Typically comes with the upper or as a kit.
- Misc.: If using a traditional build, you’d need delta ring assembly (delta ring, spring, snap ring) and front handguard cap – but those are only if you use a traditional front sight base and clamshell handguards. Most modern builds with free-float rails won’t use those, as the free-float handguard clamps to a custom barrel nut. We will describe the free-float method, as it’s common for DIY.
Tools Needed:
- Armorer’s Wrench: This is critical for tightening the barrel nut (must fit your specific nut) and often for the muzzle device as well.
- Torque Wrench: Highly recommended to torque the barrel nut to spec. AR-15 barrel nut spec is typically 30–80 ft-lbs.; basically tighten to at least 30 ft-lbs. and then tighten further to align the next notch for gas tube clearance. We will aim ~40-50 ft-lbs. and up if needed for alignment, but not exceeding 80 ft-lbs.
- Vise with Upper Receiver Block: Assembling an upper is much easier with the upper clamped in a vise. Use a specifically designed upper receiver vise block (or reaction rod that locks into the barrel extension) to avoid damaging the receiver.
- Punches and Small Hammer: for the forward assist roll pin and ejection port cover pin if needed.
- Muzzle Device Tools: Often just the armorer’s wrench and torque wrench. A vise helps hold the barrel when torquing the muzzle device. Use appropriate spacer (crush washer).
- Gas Block installation tool: If using an A2 front sight base, you might need a large punch to drive in taper pins. If using set-screw or clamp-on gas block, some thread locker (high-temp) for set screws.
- Lubricant: A bit of light oil or moly grease on barrel nut threads and barrel extension can make torquing smoother and prevent galling.
- Headspace Gauges (optional but recommended for expert): GO and NO-GO gauge for your caliber to ensure the bolt locks properly but not on a no-go (excess headspace). Typically, quality pre-made barrels and bolts are within spec. If you bought both new from reputable sources, they’re usually fine, but checking headspace is a good safety practice if you have gauges.
Now, let’s assemble the upper:
Beginner: Upper Receiver Assembly Step-by-Step
- Install Ejection Port Cover: It’s easier to do this first while the upper is empty.
- Locate the ejection port cover door, hinge pin/rod, spring, and C-clip.
- On the upper receiver, note the two small loops on the right side for the cover. The pin passes through them and the door’s hinge.
- Begin by sliding the rod a couple of inches through the front loop of the receiver. Then place the cover door in position (align its hinge with the loops).
- Insert the spring: The small ejection port cover spring has two legs—orient it so one leg will press against the receiver and the other against the cover door. Hook one leg on the door and one on the upper (you rotate the spring 180 degrees from its relaxed state to tension it). A trick: insert the spring onto the rod when the rod is partway, then rotate the spring so it locks in place (cover should want to spring open).
- Once spring is in, push the rod through the rest of the way, capturing the cover and spring. The rod might have a groove at the end; secure it with the tiny C-clip on the rod’s end on the forward end to keep it from sliding out. (Careful, that clip is tiny and can fling off; cover with finger when snapping it on).
- Test the door: It should freely open (springing fully open) and close (snapping shut with the detent on the door catching the receiver).
- Install Forward Assist (if applicable): (Skip if your upper has no assist or it’s pre-installed).
- The forward assist assembly goes on the upper’s cutout on the right rear. It typically includes the assist plunger, spring, and a small roll pin that secures it.
- Insert the spring onto the forward assist plunger. Push the plunger into its hole on the receiver (you’ll see an aligning flat or tooth that engages the notches on the inside).
- While pressing the forward assist in (you’ll feel spring tension), align the holes for the retaining pin. The pin hole runs horizontally through the boss on the receiver and through a notch in the assist plunger.
- Gently tap the roll pin in with a small punch until flush. This locks the forward assist in place.
- Function check: Press the forward assist pawl – it should spring back and you should hear the clicking of the pawl that would engage the BCG’s serrations. If it moves freely and springs out, it’s good.
- Mount Upper in Vise: Secure your upper receiver in the vise using a proper upper clamp or reaction rod. This is crucial for the next steps involving high torque.
- Insert Barrel into Upper: Take your barrel and remove any protective covers. Check that the barrel extension (the steel section with lugs) is clean and the index pin (small protruding dowel) is present at top. Also ensure the upper barrel nut threads are clean.
- Lightly oil or grease the barrel extension and uppers threads.
- Align the barrel’s index pin with the notch in the upper receiver’s barrel receptacle (it only fits one way, ensuring correct alignment). Push the barrel fully into the upper until it seats – the index pin in the slot and the extension flush with the upper.
- Slide the barrel nut over the barrel and thread it onto the upper receiver threads by hand.
- If using a standard barrel nut (like for a GI delta ring), you’ll also have the delta ring assembly to put on before the nut (slip delta ring, then spring, then snap ring onto barrel before threading nut). If using a free float handguard’s proprietary nut, use what the manufacturer provided.
- Hand-tighten the barrel nut.
- Torque the Barrel Nut: Attach the armorer’s wrench to the barrel nut. Connect the torque wrench to the wrench (if not integrated). The goal is to torque to at least 30 ft-lbs. and then align for the gas tube path.
- Tighten the nut to about 30 ft-lbs. (if you have a calibrated wrench). Loosen it. Then tighten again to, say, 40-50 ft-lbs. The common practice is to tighten-loosen 2–3 times to smooth out threads, then do a final torque.
- On the final torque, go to the minimum where a gas tube hole in the nut aligns with the upper’s gas tube channel (the top of receiver). If you hit 50-60 ft-lbs. and it aligns, stop there. If not yet aligned, you may go a bit more, up to 80 ft-lbs. max. Do not exceed the max or you risk damaging threads or over-stressing. Usually, you’ll find an alignment around 50-70 ft-lbs.
- When aligned, the barrel nut notches (or holes, depending on style) will allow the gas tube to pass through into the upper’s receiver hole easily.
- If using a proprietary handguard nut, follow their torque spec (e.g. Aero’s ATLAS rail nut is 35-65 ft-lb range, others might be similar). Align any special indexing as per instructions.
- Install the Gas Block and Gas Tube: (Some might consider this part of the “Gas System” chapter, but physically it’s done now.)
- First, locate the gas port on your barrel (a small, drilled hole on top of barrel). The gas block must line up with this. Many barrels have a dimple on the underside for set-screw gas blocks – that dimple corresponds to proper alignment for one of the screws.
- If using a standard A2 front sight base (FSB) with taper pins: that typically requires the pins to be hammered in, and alignment is ensured by the pins/barrel holes. This is more advanced and often the FSB comes pre-pinned. If you have that, you likely would have installed it before the barrel nut, including the handguard cap. Beginners usually use low-profile gas blocks instead.
- For a low-profile gas block: Slide the gas block onto the barrel (don’t forget to slide on any handguard cap first if you’re using 2-piece handguards). Ensure the gas block’s hole aligns with the barrel’s port. The block usually has a small hole where the gas tube fits – that should be on top, aligning with the barrel port on top.
- Insert the gas tube into the gas block (if not already). Orientation: the gas tube has a small roll pin hole near the end that goes in the gas block, and the other end (with a slight bend/drop) goes into the upper receiver. The open end of the gas tube (where gas enters) faces the gas port inside the block.
- Once the gas tube is in the block properly (check that the small hole in the tube aligns with the pin hole in the block), tap in the tiny gas tube roll pin to lock the tube to the block.
- Now slide the gas block assembly fully onto the barrel journal, aligning over the gas port.
- Alignment tip: You can look through the upper receiver and peer down the barrel’s gas hole to see if the gas tube is centered in the receiver’s hole (or use a thin rod through the gas tube path to feel alignment). If the barrel has a dimple, align the set screw with that.
- Tighten the gas block. For clamp-on styles, tighten the clamp screws evenly. For set-screw styles, apply blue Loctite if desired (some avoid Loctite due to heat; others use Rocksett if extremely hot environment, but usually blue Loctite is fine up to a point – note Aero warns thread locker can void some warranties on gas block screws). Then torque the set screws snug (~25 inch-lbs. common).
- If you have a pinned FSB, you’d drive in the taper pins from the small end, usually right to left.
Now the barrel with gas block and tube is installed. The gas tube should protrude into the upper receiver through the barrel nut and into the upper, stopping at the gas key area. Make sure the gas tube is centered in that channel and not binding.
- Install the Handguard: This will vary depending on type:
- For a free-float handguard (keymod/M-LOK tube style): Typically, it slides over the barrel and gas block and indexes either via a locking collar or alignment tabs with the upper. Commonly you must align the rail with the upper receiver rail. Some use screws to pinch onto a barrel nut, others thread on.
- Example: A typical free-float like a Midwest Industries or BCM rail uses a proprietary barrel nut (installed already) and then the handguard slides on and is secured by 2-4 screws that clamp it to the nut. Simply slide it so the top rail is flush with the upper’s rail and tighten those screws to specified inch-lbs. (often ~40-50 inch-lbs., sometimes with thread locker).
- If using the classic delta ring and 2-piece handguards: slip the triangular handguard cap over gas block before installing it, then after gas block pinned, pull down the delta ring spring and insert the two handguard halves. This can be tricky but is a known process. Since most new builds go free-float, we won’t detail that heavily.
- Ensure any anti-rotation set screws or tabs on the handguard are engaged properly to prevent it from rotating under use.
- After securing, the handguard should be solid, no movement, and the top rail aligned evenly with the receiver’s rail (if it has a top rail).
Upper Receiver Group Parts Ready for Assembly. In this image, an upper receiver is shown with major components: barrels of different lengths (top and bottom), a free-float handguard (mounted on the upper), a bolt carrier group (right), and muzzle devices (flash hider and brake). These parts will come together in the upper assembly. Free-float handguards like the one shown cover the barrel and improve accuracy by not exerting pressure on it.
- Install Muzzle Device: Almost done – now attach your muzzle device to the threaded muzzle.
- Most AR barrels have 1/2x28 threads. Put the crush washer on first (dome side toward the muzzle device, flat side against the shoulder of barrel). Thread the muzzle device on by hand until hand tight against the washer.
- Now, orient the muzzle device correctly: for an A2 flash hider, the closed bottom should be down (to reduce dust signature). For brakes/compensators, position their ports as instructed (often evenly, or specific orientation).
- Use the armorer’s wrench (which typically has slots for common muzzle devices) or an appropriate size wrench on the device’s wrench flats. Tighten the device further until it times correctly (the crush washer will deform to allow it). Usually, you tighten about 1/4 turn (maybe to ~15-20 ft-lbs.). Do not over-crank it; if it’s not lining up, you can back off and try a new crush washer or shim kit which gives finer control.
- If using a torque wrench on a muzzle device (not critical to exact number as with barrel nut), just ensure it is snug and properly indexed.
- Note: Some devices use shims instead and specify a torque (like 20-30 ft-lb) – follow those instructions if so. Also, if you plan to frequently swap muzzle devices (or attach suppressors), you might avoid crush washers (they are one-time use typically) and use shims or a locking device.
- Install Charging Handle and Bolt Carrier Group: Now that the upper’s hard assembly is done, insert the operating parts:
- Take your charging handle, depress its latch, and insert it into the upper’s groove from the rear about an inch. You’ll feel it fall into a channel.
- Take the assembled BCG (ensure it’s oiled). It’s good to do a quick field strip check: confirm the bolt’s gas rings are staggered (they rotate on their own, so not super critical, but ensure they’re not aligned). If you have headspace gauges, this is where you would remove the bolt from carrier, clean chamber, and check that the bolt closes fully on a “GO” gauge and does not close on a “NO-GO” gauge for your caliber. Most new parts are fine, but experts check anyway for safety.
- Pull the bolt out to the extended position (so it can lock into barrel) and insert the BCG into the upper, underneath the charging handle. The gas key on the BCG fits into the slot of the charging handle. Push them together all the way forward.
- The charging handle should latch, and the BCG should seat with the bolt locking into the barrel extension lugs. If you press the forward assist now, it should engage the BCG’s serrations and help push it (though if properly assembled, it should already be fully forward).
- Now your upper is fully assembled and functional.
- Join Upper and Lower Receivers: Align the upper with the lower, hinge them together by inserting the front pivot pin through the upper’s lug. Then swing the upper down and push in the rear takedown pin. Now you have a complete AR-15!
- Do a basic function check again: Charge the weapon (pull charging handle, let bolt go forward on empty chamber) – the bolt should lock by the hammer. Put on Safe, pull trigger – nothing should happen. Put on Fire, pull trigger – you should hear the click of hammer drop (again, do this with no ammo and preferably snap cap if dry firing often). Hold trigger, rack the bolt (cock hammer), release trigger – you should hear the reset click, then you can fire again. Also insert an empty mag and pull bolt back – it should lock open on the empty mag; drop mag, the bolt catch should hold it, then release bolt catch to close.
For a first-time builder, assembling the upper is the most challenging part due to the barrel nut torque and gas system alignment. Take your time, use proper tools, and don’t hesitate to ask a knowledgeable friend or reference more videos if uncertain. Brownell’s’ video series is a great reference – for instance, their guide cautions on common mistakes in upper assembly and how to avoid them. Key points: ensure proper torque on the barrel nut, correct gas tube alignment, and proper staking of the BCG’s gas key (usually pre-done by manufacturer).
Intermediate: Enhanced Upper Builds
Upgrading or tweaking the upper assembly for improved performance is a natural next step once you understand the basics. Here are intermediate considerations:
- Free-Float Handguard (if not already done): We mostly covered free-float above since it’s common. If you built a basic upper with a clamshell handguard and FSB, an intermediate upgrade is to free-float the barrel. This could mean swapping the delta ring/barrel nut for a new free-float handguard system. The benefit is improved accuracy and more modular accessory mounting. Ensure the free-float handguard is rigid and of good quality (e.g., BCM, Midwest, Geissele rails) for best results.
- Better Barrel Selection: An intermediate build might choose a barrel tailored to purpose. For example, a chrome-lined mil-spec barrel for durability in a defense carbine, or a stainless-steel match barrel for precision shooting. Barrel quality greatly influences accuracy. A premium barrel (e.g., from Criterion, Faxon, White Oak) can shrink group sizes, especially with good ammo. Also consider twist rate and chamber – 5.56 NATO vs .223 Wylde (Wylde is a popular compromise that safely fires 5.56 but can have match accuracy with .223). Intermediate builders also consider different calibers: you could build an upper in 300 Blackout, 6.5 Grendel, etc., for different uses, as long as you have the correct bolt and barrel for that caliber.
- Muzzle Device Upgrades: Swapping the basic flash hider for a muzzle brake or compensator can reduce recoil and muzzle climb. The trade-off is more noise and flash to the sides. Intermediate users try devices like BCM Gunfighter comp, VG6 Precision brakes, etc., to stay on target faster. Installation as described before. Always re-check timing when using new washers/shims.
- Gas System Choices: While the physical installation is the same, intermediate builders might choose a different gas system length or an adjustable gas block. For example, if building a 18” barrel rifle, using a rifle-length gas system can yield a smoother recoil impulse than carbine length (gas port further out = lower pressure at action). Adjustable gas blocks allow you to tune the amount of gas for reliability vs recoil (especially useful if running a suppressor which adds backpressure). Installing an adjustable block is the same, but then you’ll adjust the screw at the range to dial in just enough gas for function. Keep in mind to lock the adjustment if required (some have detents, others might use lock screws).
- Headspace Check: We touched on headspace – intermediate builders should, if possible, check headspace with proper GO/NO-GO gauges, especially if using a bolt and barrel from different sources. Most manufacturers produce within tolerances, but it’s an extra safety step. If a bolt won’t close on a GO gauge, that’s a problem (chamber too tight). If it closes on a NO-GO, that’s a bigger problem (chamber too loose/excess headspace – unsafe). A Field gauge is even longer; if it closes on that, it is definitely unsafe to shoot. In practice, new barrels and bolts rarely have a headspace issue, but it’s wise to check or have a gunsmith check.
- Bedding/Lapping the Upper Receiver Face: A technique to potentially improve accuracy is to lap the front face of the upper receiver (where the barrel extension seats) to ensure it’s perfectly square and flush with the barrel extension. This can increase consistency of barrel harmonics and improve accuracy marginally. Brownells sells a lapping tool for this. To do it, you remove the barrel, insert the lapping tool with abrasive, and turn it to grind the face true. This is intermediate/expert because you are removing a tiny bit of material. Only do it if you suspect misalignment or are chasing max accuracy. Caleb from Brownells notes it may not be necessary on modern quality uppers, but it doesn’t hurt if done carefully.
- Enhanced Bolt Carrier Group: While any mil-spec BCG will do, intermediate builders might choose features like MPI/HPT tested bolts (Magnetic Particle Inspected/High Pressure Tested) for assurance of strength, or coatings like Nickel-Boron or Nitride for smoother operation and easier cleaning. Some BCGs have things like forward assist cuts (almost all do) and improved extractors (springs or O-rings for reliability). Upgrading the extractor spring (e.g., adding an O-ring booster) on a standard bolt is a simple tweak for better extraction if running under harsh conditions (common in carbine-length gas 14.5-16” guns).
- Charging Handle Upgrade: An ambidextrous charging handle (like Radian Raptor or BCM Gunfighter) makes weapon manipulation easier, especially under optics or if left-handed. Installation is the same; they just drop in. They often have better latches and reduce the risk of gas in face when suppressed.
- Precision Upper Assembly: If building a DMR/precision upper, intermediate steps include making sure the barrel nut is torqued and possibly loosened and re-torqued a few times to relieve stress, using some rocksett on gas block screws to handle heat, and aligning the handguard very straight for use with iron sights or lasers (if your handguard has a top rail continuing the receiver rail, ensure no cant or gap).
- Accessory Mounting: Intermediate builders plan the upper with accessories in mind: If you’ll mount backup iron sights (BUIS), pick ones that fit with your setup (gas block height vs rail height issue – a front sight on an actual gas block that’s lower than rail needs a taller sight or just use rail-mounted sights on a free-float). If using optics, think about rail space and eye relief – maybe go with a continuous top rail handguard for flexibility.
Best Practices (Intermediate Upper): Remember to always re-check the tightness of anything screwed on after the first few shooting sessions. Barrel nuts seldom loosen if properly torqued and often staked or held by gas tube, but handguard screws should be checked (use a paint pen witness mark). Muzzle devices should be snug; if using suppressors, consider using Rocksett (high-temp thread locker) on the muzzle device threads so it doesn’t unthread when removing a tight suppressor.
Also, note how your brass ejects when you test-fire: classic AR ejection pattern is 3-4 o’clock. If you see it blasting forward 1-2 o’clock, your rifle might be over-gassed (common in carbine gas barrels) – an adjustable gas block or heavier buffer could help. If it’s dribbling out at 5 o’clock, might be under-gassed or too heavy a buffer. These are fine-tuning items for intermediate builders to diagnose and correct for optimal performance.
Expert: Advanced Upper Receiver Work
For those aiming to build a top-tier upper or specialized configurations, here are expert-level considerations:
- Match-Grade Assembly Techniques: In addition to lapping the receiver face as mentioned, some expert builders will “bed” the barrel extension to the receiver. This can be done with things like Loctite 609 or 620 (a retaining compound) applied lightly on the barrel extension before torquing the barrel nut. The idea is it fills any microscopic gaps and retains the barrel in the same position shot to shot. The Brownells guide mentions barrel bedding may not be necessary if things fit well, but some precision builders still do it. If you do, use only a little so you can remove the barrel later if needed (or heat to break the compound).
- Cryo or Stress Relief: Some high-end barrel makers cryogenically treat barrels for stability. As an expert assembling a super precision rifle, you might seek barrels with this treatment. Not something you do during assembly, but a choice when buying barrel.
- Gas System Tuning & Suppressor Ready Builds: If you plan to run a suppressor often, experts will often incorporate an adjustable gas block or a gas regulator like the Bootleg adjustable BCG or Gemtech suppressed bolt carrier. Tuning the gas to your specific ammo and suppressor can smooth out operation. This is an expert endeavor because you might be adjusting settings for different conditions. Also, choosing the right buffer and spring combination goes together. Some experts use adjustable gas keys or gas tubes (with vents) for fine tuning as well.
- Extended or Alternative Uppers: Expert builders might experiment with non-standard uppers like side-charging uppers (which require different BCG or modifications). They might also build left-handed ARs (Stag makes left-ejecting uppers) for lefty shooters – requiring left bolts, etc.
- Barrel Accuracy Tips: For ultimate accuracy, consider fluting (order a barrel that’s fluted for rigidity and cooling weight reduction), using a longer gas system than normal if possible (e.g., intermediate gas on an 18” instead of mid-length, to further soften pressure), and quality ammo. A great upper can only shine with good ammunition – experts tend to handload or buy match ammo for their precision AR builds.
- Caliber Conversions: Building AR-15 uppers in calibers like 6.5 Grendel, .224 Valkyrie, 6.8 SPC, etc., might be an expert pursuit. Each has nuances (bolt strength, magazine types). Always use the correct bolt and magazine for the caliber. For example, 6.5 Grendel needs a Grendel bolt (different face size) and perhaps an enhanced firing pin protrusion. Research each caliber thoroughly – beyond scope here.
- Muzzle Device Timing for Recoil Control: An expert might tune the exact timing of a compensator to account for their shooting style. For instance, some brakes allow you to clock them slightly to counteract your personal pull or stance if rifle recoils off-center. This is really fine-tuning. It might involve trial and error at the range, shimming, and re-testing.
- Optics Mounting (in context of upper): Not assembly of the upper per se, but experts building a rifle will pay attention to how they mount optics on the upper. Using one-piece cantilever mounts torqued to spec (typically like 20-25 in-lbs. on rings, 30-65 in-lbs. on rail clamp depending on manufacturer). Lapping scope rings if necessary to ensure no stress on the scope tube. Leveling the scope properly, and possibly bedding the scope mount if extreme precision (rarely needed with quality mounts). This bleeds into the optics chapter, but it’s part of the full upper’s performance potential.
- Quality Checklist: Experts will inspect everything: gas block alignment (maybe using a bore scope to see the port alignment), even measure headspace if they have gauges each time they swap a bolt, check that the bolt lugs all bear properly (using marking compound to see contact patterns), and polish feed ramps if there are burrs (if, say, a mismatch between upper and barrel extension feedramps leaves a sharp edge, one might lightly smooth it). These fine details can improve reliability in harsh conditions or with mixed ammo.
- Troubleshooting During Build: If an expert cycles dummy rounds through the assembled upper/lower and notices, for example, bolt won’t lock back or feed issues, they will troubleshoot before even going to live fire. Check alignment of gas tube (BCG should slide in freely without gas key binding on tube – if binding, adjust tube alignment slightly by re-centering gas block or tube bend). Check that ejector can push rounds out (some experts polish the ejector to ensure smooth movement, or slightly bevel the edge of ejector to better slip past case rim – not usually needed, but a tweak). Check extractor tension (add O-ring if extraction seems weak).
- Documentation & Data: True experts treat each build scientifically – they might keep a log of torque values they used, lot numbers of parts, and then how the rifle performs (groups, velocities, malfunctions). This helps refine future builds. For instance, if a certain barrel nut torque yielded best accuracy in one build (some claim slight differences can show up in group sizes), they note it.
Upper Receiver Build Examples – Budget vs. Premium
- Budget Upper Example: A basic upper might use a PSA (Palmetto State Armory) 16" barrel (5.56 NATO, chrome-moly steel) with a carbine-length gas system and an A2 front sight base. The handguards are standard M4 two-piece plastic. The BCG is a standard phosphated mil-spec from PSA or Toolcraft. Charging handle is basic. Muzzle device is A2 flash hider. This could be assembled by buying a kit or separate parts totaling approximately $300-400 for the upper. It’s a no-frills, serviceable upper with acceptable accuracy (~2-3 MOA with good ammo) and full reliability. It mirrors a military M4 style. Weight is a bit more due to the clamshell handguard and FSB, but it’s robust. Pros: inexpensive, proven design. Cons: not as modular (fixed FSB limits optic mounting unless using a carry handle or adding railed handguard), and recoil may be a bit sharper due to carbine gas.
- Mid-Tier Upper Example: An intermediate build could use an Aero Precision forged upper ($80) with a 16" mid-length chrome-lined barrel from Ballistic Advantage or FN (~$200). Mid-length gas gives a smoother recoil impulse. Use a low-profile gas block ($30) and a free-float M-LOK handguard, say a 13" Aero Atlas S-One handguard ($150) which is lightweight. The BCG might be a nitride-coated model from Faxon or BCM ($150) for durability. Add a BCM Gunfighter charging handle ($50). Muzzle device: a VG6 Gamma brake ($70) for better recoil control. This mid-tier upper costs around $600-700. It offers improved accuracy (~1.5-2 MOA) and shootability. The free-float rail allows mounting lights, lasers, whatever accessories easily. It’s a great general-purpose upper for defense or competition. Pros: softer recoil, more accuracy, modular. Cons: higher cost, muzzle brake is louder to shoot.
- Premium Upper Example: Here we pull out all stops. Consider a VLTOR or Larue billet upper receiver ($200+) for precision alignment. The barrel could be an 18” stainless match-grade barrel from White Oak Armament or Criterion ($300) for long-range accuracy, with a rifle-length gas system. Use a Geissele or Midwest URR barrel nut and a 15” Geissele MK16 free-float rail ($300) known for rigidity. The gas block would be an adjustable type, like Superlative Arms ($100), to fine-tune the rifle’s cycling. BCG could be a high-end one like Young Mfg. National Match chrome BCG ($250) or a precision lapped one. Charging handle may be a Radian Raptor ambi ($80). Add a SureFire WarComp muzzle device ($150) that doubles as suppressor adapter. This upper might cost $1200+. It’s built for accuracy <1 MOA and/or for use with a suppressor (hence adjustable gas). Pros: maximum accuracy and very refined recoil and component quality. Cons: diminishing returns on cost – you pay double for a 10-20% performance gain. Also, a precision stainless barrel may be heavier and a bit less long-life than chrome-lined.
Between these extremes, you can mix and match to meet your budget and goals. Often a good strategy is to invest most in the barrel and BCG – those affects shooting the most – and you can economize on things like handguards or stocks which can be upgraded later easily. For example, even a budget upper with a quality barrel can shoot excellently.
Before leaving the upper section, remember to always lubricate your BCG properly before shooting. A dry rifle can cause malfunctions. New builders sometimes under-lube because they want to keep things clean, but AR-15s run well with a bit of lube on sliding parts (bolt, cam pin, inside upper rails). We’ll cover cleaning and lube points in troubleshooting, but as an expert note: “wet is better than dry” for AR reliability.
Having assembled both lower and upper, in the next section we’ll discuss the Gas System in more detail – which we’ve partially installed – to understand how different configurations (pistol, carbine, mid, rifle gas) affect the build and how to troubleshoot gas-related issues.
Gas Systems Explained and Tuning
The AR-15’s operating system is gas impingement (in standard configuration). This means part of the propellant gas from each shot is siphoned from the barrel through a small port and redirected back to cycle the action. Understanding and choosing the right gas system is vital for a reliable build. In this chapter, we’ll explore gas system lengths, components, and options like adjustable gas blocks and piston conversions. We’ll also give tips on assembling and tuning for each experience level:
- Beginner: Basic knowledge of gas system length (carbine vs mid vs rifle) and ensuring the gas block and tube are installed correctly (much of which we already did in upper assembly). Focus on getting a reliable, standard gas setup.
- Intermediate: Changing or tuning the gas flow, e.g., using heavier buffers, adjustable gas blocks to reduce recoil, or building non-standard lengths (e.g., if doing a pistol build or 14.5” pinned barrel, etc.). Maybe trying out a piston kit.
- Expert: Fine-tuning gas for suppressor use or competition (very soft shooting), diagnosing over-gassing or under-gassing conditions by reading brass and recoil, and an advanced piston systems or rare configurations.
Gas System Basics
The standard AR-15 uses the Direct Impingement system, more formally the “Stoner system,” where gas travels down a thin tube to impinge on the bolt carrier’s gas key, driving the bolt carrier back. Key components:
- Gas Port: A small hole in the barrel, located a certain distance from the chamber. The distance defines the gas system “length.”
- Gas Block: A block that captures gas from that port. It may incorporate a front sight (A2 style) or just be a low-profile block. It’s secured to the barrel and has an internal channel from port to gas tube.
- Gas Tube: A thin metal tube running from the gas block into the upper receiver, ending above the chamber in the gas key of the BCG.
- Gas Key: The hollow metal protrusion on top of the bolt carrier that interfaces with the gas tube. It is screwed and staked to the bolt carrier.
- Bolt Carrier & Bolt: The bolt has rings that seal in the carrier. Gas flows into the carrier key, into the expansion chamber in the carrier, pushing the carrier rearward while forcing the bolt forward (relative motion). This unlocks the bolt and cycles the action.
Gas system lengths (distance from chamber to port) commonly are:
- Pistol length: ~4” from chamber (found on very short barrels, 7-10”).
- Carbine length: ~7” from chamber (found on 14.5-16” barrels typically).
- Mid-length: ~9” from chamber (ideal on 14.5-18” barrels; common on 16” for smoother operation).
- Rifle length: ~12” from chamber (used on 20” barrels, the original M16 length).
- Intermediate or custom: Some manufacturers have in-between like “Intermediate” (~11” on some 18” barrels used by Noveske, etc.).
Longer gas systems generally yield lower gas pressure by the time the bullet passes the port (because the bullet is further down, more volume behind it, pressure dropped), thus a softer impulse. Short systems tap gas earlier when pressure is high, causing more force – which can mean reliable cycling in short barrel, but also more recoil and stress. That’s why a 16” with carbine gas often is a bit over-gassed, whereas a mid-length on 16” is just right.
Gas Block Types: We mentioned fixed (A2 FSB) vs low-profile. Also, adjustable gas blocks have a screw or mechanism to restrict gas flow. There are also pinned vs set-screw vs clamp mounting styles:
- Pinned (taper pins like mil-spec) are very secure but need a drilled barrel or pre-pin.
- Set-screw (with dimples on barrel) is common for low-pro blocks on many barrels.
- Clamp-on uses two screws to clamp around barrel – gentle on the barrel (no dimpling needed) and very secure if well-made.
Piston Systems: Instead of a gas tube, some kits (or specific uppers like HK416) use a gas piston. A small piston in the gas block is pushed by gas and it pushes a rod that impacts the carrier (usually a modified carrier without gas key). Pistons run cooler and cleaner in the receiver (less gas fouling), but can add weight and sometimes reduce accuracy (impulse on barrel) or cause carrier tilt issues. They’re beyond beginner scope, but intermediate/expert might explore them if desired (especially for suppressor use to reduce gas blowback).
Beginner: Ensuring a Reliable Gas System
For a first build, we assume you used a standard direct impingement system with a correctly chosen gas tube length and a properly installed gas block as per the Upper Assembly chapter. Here’s what a beginner should focus on:
- Correct Gas Tube Length: Verify the gas tube you installed matches your barrel’s requirement. Example: if you have a 16” barrel designed for mid-length, ensure you used a mid-length tube (~9.8” long), not a carbine tube (~7.5”). Using the wrong length tube either won’t reach the gas key or will be too long.
- Gas Block Alignment: As detailed before, misalignment can cause serious cycling problems. A small misalignment means less gas getting through, potentially causing short-stroking (failure to cycle fully). Beginners, if using set-screw blocks, should really utilize that dimple on the barrel (most quality barrels have one) – it lines up the block for you. If there’s no dimple, you can try to eyeball equal spacing from block shoulder, but it’s tricky; might consider using an alignment tool or making your own dimple (only if comfortable). For clamp blocks, typically just butt it against the shoulder or measure the port center to shoulder vs block port to edge.
- Tighten Everything: That tiny gas tube roll pin – ensure it’s fully seated (flush or just below flush both sides). Gas block screws should be tight (use the inch-lb. torque from manufacturer if given, or “snug plus a quarter turn” if none – usually around 20-30 inch-lbs.). The gas key on your BCG is factory installed – quick inspect that its screws are staked (metal pushed into screw heads). If not staked and you have the tools, stake them to avoid loosening (though almost all come staked except some fancy adjustable keys).
- Ammunition and Break-In: A new build might be a bit stiff. Use decent full-power ammo for initial testing (5.56 NATO spec or quality .223). Underpowered ammo might not cycle until the action is smoothed out. Also, lubricate the BCG generously at first – more gas pressure is needed to move a dry, tight BCG.
- Buffer/Action Spring: These relate but are part of lower. Ensure you used a standard carbine spring and buffer for carbine tubes (or rifle spring/buffer for A2 stock). A wrong combo can affect cycling. For example, a rifle buffer in a carbine tube would be too long and physically stop the BCG (but that’s hard to even assemble as it wouldn’t fit). Just be mindful that you matched components.
If you assembled as guided, most likely your rifle will shoot and cycle fine. Test it by firing one round with a magazine inserted – it should lock back the bolt on empty mag (this proves you have enough gas to cycle fully and that your bolt catch and mag work). If it doesn’t lock back, that indicates a potential under-gassing issue or something impeding function (we’ll troubleshoot later).
Why not mention dwell time? As a note to curious beginners: “dwell time” is the time between the bullet passing the gas port and leaving the barrel. This is when gas is flowing into the system. Short barrels have short dwell after the port (like on a 10.5” with carbine gas, there’s maybe 3” of barrel after port – short dwell) so they may struggle to cycle without bigger ports or more pressure. Long barrels with short gas (like 20” barrel with mid gas) have huge dwell, can be over-gassed. Barrel makers adjust port size to balance this, but that’s why you stick to recommended combos (like don’t put rifle gas on a 14.5,” it likely won’t cycle because dwell is too short unless port drilled huge).
Intermediate: Tuning and Modifying the Gas System
At this level, you might want to adjust how your rifle handles, either to reduce recoil or accommodate special setups (like very short barrels or suppressors). Key areas:
- Adjustable Gas Blocks: By limiting how much gas enters the system, you can reduce the gas pressure driving the BCG. This often softens recoil (the BCG isn’t slamming as hard) and can reduce wear. It’s also useful to prevent over-gassing when using a suppressor (suppressors increase back-pressure).
- Typical adjustable blocks have a screw that you turn in (to reduce gas flow) or out (to increase). Tuning procedure: start with it open enough to cycle reliably with your weakest ammo, then dial it down until the rifle barely cycles properly (plus maybe a quarter turn open for reliability margin). Do tuning unsuppressed and suppressed if applicable (some blocks have settings for both).
- Some blocks like Superlative Arms bleed off excess gas rather than restricting it, claiming smoother operation.
- The downside: adjustments can foul over time – so once tuned, leave it, or occasionally clean that screw. Also, if you forget to open it when using lower-power ammo, you could get a malfunction. Simplicity for defensive use might favor non-adjustable (full gas) for utmost reliability in all conditions.
- Heavier Buffers or Springs: The gas system doesn’t exist in isolation – it works with the buffer and spring to determine cycling speed. Intermediate builders experiment here. For example, an H2 buffer (around 4.6 oz vs standard 3 oz) will slow the BCG a bit, giving a softer feel and maybe more controlled ejection. If your rifle is slightly over-gassed (violent ejection pattern forward), an H2 or H3 buffer can calm it down. Springs like Sprinco “Blue” or “Red” are extra power and similarly slow the action. You want to ensure the combination still allows the bolt to lock back on empty and feed reliably.
- Changing buffer is easy: just swap in/out (with upper separated, press buffer retainer and remove buffer and spring, then change buffer and reinsert).
- Note: Overdoing weight can cause failures to eject or feed if the system doesn’t have enough oomph (especially with weaker ammo or cold weather).
- Gas Port Enlargement (or reduction): This is more an expert gunsmith thing, but mention: if a particular barrel is under-gassed (some barrels, especially older or off-spec, might have too small a port), one could drill it slightly larger. Do NOT attempt casually – tiny changes make a big difference and you risk ruining the barrel’s timing. Conversely, if severely over-gassed and you had no adjustable block, a heavier buffer might not be enough, then you might consider a smaller port gas tube insert (some companies make tubes with a tiny orifice to restrict gas as an alternative to block). Typically, stick to buffers/blocks rather than drilling unless you really know port size norms.
- Piston Conversion: Intermediate builders sometimes try a gas piston conversion kit (Adams Arms, Superlative, Osprey Defense, etc.). Installation usually requires removing the gas block and tube and replacing with a piston gas block and a rod that runs to a special bolt carrier (or a modified key on your carrier). It can be done with basic tools, but ensure the kit matches your barrel length (piston kits often are tuned to certain lengths). Benefits: runs cooler/cleaner in the receiver, might be more reliable in short barrels or with suppressor. Downsides: cost, sometimes reduced accuracy (minor) and more impulse to the action. Some love pistons for SBR (Short Barrel Rifle) builds to avoid gas to the face when suppressed.
- Alternative Gas Systems: There’s the Bootleg Adjustable Bolt Carrier which has vent settings on the carrier itself – an interesting alternate to an adjustable block, controlled by a simple dial on the carrier. Or regulated gas keys like the Gemtech, which let you select suppressed/unsuppressed by a screw in the key. These are intermediate solutions that don’t require messing with the gas block once installed.
- Building AR Pistols (short barrels): If doing a barrel under ~10”, you might encounter more finicky gas behavior. Many 7.5” barrels are extremely over-gassed to ensure they cycle, which can batter parts. An adjustable block on these can be a godsend for reliability and recoil. Also ensure you use an enhanced extractor spring (most quality BCGs include this now) because short systems extract cases faster (when chamber pressure might still be high, making extraction harder – thus stronger extractor spring & insert helps avoid torn case rims or extraction failures).
- Gas System and Caliber: If you’re building in a different caliber, know that, for example, .300 Blackout with a pistol gas 8” barrel can run reliably both unsuppressed and suppressed if ported right – but subsonic ammo especially needs pistol gas. Or 7.62x39 uppers often use specific enhanced firing pins and different weight buffers. Intermediate research for each caliber is needed. For most, the 5.56 system is our baseline.
Signs of Over vs Under Gassing (for intermediate diagnostics):
- Over-gassed: Ejection is forward (1-2 o’clock), cases may be dented severely (from hitting deflector hard), recoil is sharp, bolt unlocks early (sometimes you see extractor tearing rim or very dirty cases indicating early unlock). The rifle may still function but it’s rough. Also, bolt may outrun magazine sometimes causing bolt-over-base misfeeds in extreme cases.
- Under-gassed: Ejection weak (dribbling out at feet or 5 o’clock with little force), bolt fails to lock back on empty, frequent short-stroke (case extracted but new one not fed, or stove-pipe). This could be due to not having enough gas or too heavy buffer/spring.
- Ideal: brisk ejection ~3-4 o’clock, reliable lockback, smooth cycling.
To fix over-gassed: heavier buffer/spring or adjustable gas to tame it. To fix under: lighter buffer (carbine standard or even lighter buffer), make sure no gas leaks (check if gas block might be loose or misaligned), ensure proper lube, maybe enlarge port as last resort.
Expert: Mastering Gas Control and Exotic Systems
Expert-level involvement with the gas system often relates to extreme reliability in adverse conditions, suppressed fire optimization, or integrating advanced tech:
- Suppressor-Optimized Builds: Running suppressors can add 20-30% more gas back into the system (due to increased bore pressure post-shot). Experts often incorporate suppressor settings – e.g., an adjustable gas block with easy switch (like some have click settings or dual set screws) so they can flick between suppressed and unsuppressed. Or use switchblock style (Novekse’s switchblock gas block physically has a setting lever).
- Another approach: Dedicated suppressed upper with a smaller gas port or a permanently adjusted gas block for suppressed-only use. That upper might not cycle well unsuppressed but is butter smooth with the can.
- Also consider venting charging handles or gas busting charging handles (PRI Gas Buster or Radian SD) to reduce blowback to the shooter’s face, plus rubber gasket on charging handle to seal the gap. These do help for heavy suppressor use and are details an expert builds in.
- Full-Auto or Rapid-Fire Abuse: If one is building an AR for full-auto fire (assuming licensed), gas system must handle high heat and sustained fire. Experts might enlarge gas port slightly on a full-auto SBR to ensure reliability when very hot (gas pressure can drop as things heat and burn rate changes). They will also definitely use an H3 or heavier buffer to slow the rate of fire down to a manageable ~700-800 rpm instead of 900+. And ensure piston or DI choice is robust (military M4s remain DI but have carefully balanced ports and heavier buffers to run around 800 rpm cyclic).
- Alternate Operating Systems: There are some niche operating systems like the OPS-416 roller delay or Blow-forward systems… not common, but an expert might experiment. One example: a Gas Trap (instead of port, the early Garand style) – very rare on ARs except for historical replication of the original AR-10 protos; not really relevant but just to mention unusual.
- Gas System Maintenance: Experts know to keep an eye on gas system wear. Over thousands of rounds, gas tubes can erode (rare in semi-auto, but can in full-auto or very high round count). Gas block screws might loosen – thus they often witness-mark screws with paint to visually check if moved. They’ll replace the action spring every ~5k rounds or when it’s shortened by a coil or two from new length (springs sag over time). They may also check the gas key staking and even re-stake if needed after many rounds.
- Academic: Gas versus Piston – experts often have opinionated stances. Some champion DI for its inherent accuracy (less mass moving on barrel) and lighter weight. Others prefer pistons for SBRs or specific use-cases. A true expert might have built identical rifles, one DI and one piston, to compare empirical results (and usually they find both have trade-offs).
- Fine Gas Tuning for Competition: For 3-Gun or competition ARs, some experts will tune gas so low that the rifle just cycles with their specific load, minimizing recoil. They combine that with lightened carriers, reduced reciprocating mass, etc. For example, using a low mass BCG + adjustable gas block + lightweight buffer can yield a very soft shooting rifle, but it might be more finicky about dirt or different ammo. This is acceptable in competition where speed matters and they can maintain the rifle often. It’s not ideal for a “duty” or defense rifle which needs ultimate reliability. So, experts tailor the gas system to the mission of the rifle.
- Troubleshooting Extreme Cases: If something is wrong and not obvious, experts can do things like pressurize the gas system to check for leaks (using compressed air at the muzzle and soapy water around gas block to see bubbles). Or measure gas port size with gauge bits if suspect it’s off spec. They’ll also examine ejection pattern not just by direction, but by case condition (sooty vs clean neck indicating timing of unlock, etc.). These diagnostic skills go beyond assembly into small arms theory.
- Permanent Suppressor Hosts: Some expert builds have the suppressor permanently attached (pinned/welded to make legal 16” if it’s a short barrel + suppressor). In those, they will absolutely tune the gas with that suppressor considered integral. Possibly drilling a smaller gas port or using a very restrictive setting, since it will never be fired unsuppressed. One might also use extra power extractor springs and special coatings (like DLC coating inside upper and BCG) to account for increased fouling.
- Running without Direct Gas: On the fringes, an expert might convert an AR to straight-pull bolt or other manual operation for specific reasons (precision or jurisdictions where semi-auto not allowed). Then you effectively “turn off” the gas (e.g., using an adjustable block closed or a gas block with no port) and just cycle by charging handle each time. Not common in US but in some countries like UK, there are straight-pull ARs. For an expert builder, it’s an interesting option if semi is restricted.
In summary, experts have a deep understanding of how the AR-15 breathes, and they manipulate that to achieve the desired shooting characteristics while preserving reliability as needed.
Now that we have the rifle’s operating system sorted, let’s move to the more user-interface parts of the build: Furniture and Accessories, where you tailor the rifle’s ergonomics and handling to your needs.
Furniture and Accessories
“Furniture” refers to the parts of the rifle that you directly interface with – the stock, pistol grip, handguard – as well as other add-ons like foregrips and rail covers. These components don’t affect the core function (the rifle will fire without a stock or with any grip), but they hugely influence comfort, control, and the rifle’s suitability for different tasks. This chapter will help you choose and install furniture, and consider accessories like slings and lights that complete a practical rifle.
We’ll break it down by skill level:
- Beginner: Likely using basic furniture (whatever came in a kit or standard M4-style parts). We’ll cover installing a basic stock and grip (already touched on in lower assembly) and the handguard (touched on in upper). We’ll also mention sling attachment basics.
- Intermediate: Upgrading to aftermarket stocks, grips, and handguards for better ergonomics. Installing things like vertical foregrips or bipods for specific uses. Swapping out furniture is relatively easy, so this is a common area of customization.
- Expert: High-end furniture and fitting the rifle to the shooter precisely – e.g., adjustable stocks for length of pull and cheek weld (PRS type stocks), tuning weight distribution, or adding specialized accessories (like IR lasers, etc., typically beyond basics). Also, considerations for recoil management (e.g., using certain stocks or pads) and how furniture choices integrate with shooting gear (body armor, etc.).
Beginner: Basic Furniture Installation
If you built with a standard kit, you likely have:
- An M4-style collapsible stock on a mil-spec buffer tube (installed by sliding on in the lower assembly step).
- An A2-style pistol grip (installed).
- A basic handguard (either a two-piece drop-in around the front sight base or a simple polymer round handguard if a low-profile gas block with end cap).
- Basic sling swivels: many rifles have a sling loop on the front sight base and a slot in the buttstock for a GI web sling, or QD swivel sockets if modern stock.
Stock Operation (Collapsible): The typical 6-position stock works by pulling the adjustment lever to move it. As a new user, get familiar with adjusting length of pull (LOP) to what’s comfortable. Generally, with the stock at a position where when you shoulder the rifle, your eye aligns with sights easily and your nose is ~1-2 inches from the charging handle (“nose to charging handle” is a common cheek weld reference taught in military).
Sling Attachment (Basic): If you have the basic sling loops, you can attach a 2-point sling: loop at the front sight base and either the slot on the stock or a loop on the end plate if present. For a basic web sling:
- Front: thread sling through front sight loop and secure via buckle.
- Rear: thread through stock slot.
There are many ways, but at beginner level just know you want a carry strap. We’ll detail sling best practices in intermediate.
Installing/Removing Handguards (Drop-in): If you have the standard delta ring and clamshell handguards:
- To remove: Ensure rifle is unloaded. Pull back on the delta ring (the spring-loaded ring around the barrel near the upper) – this requires some hand strength or a helper tool (handguard removal tool). By pulling it toward the receiver, the two handguard halves can pop free. Remove one half at a time.
- To install: Reverse – seat the front of each half in the handguard cap near the FSB, then pull delta ring back and drop the rear of the handguard in, then release ring to lock them.
This can be tricky the first time, but that’s the mechanism. These plastic guards often have heat shields inside. They’re fine for moderate firing but can heat up with sustained fire.
Basic Grip Feel: The A2 grip (with a finger ridge and hollow core) is standard military issue. Some people find the finger bump uncomfortable. It’s perfectly usable though. It usually has a trapdoor to store small items (like an extra firing pin or batteries). If it’s not comfortable, a common first upgrade is to a more ergonomic grip (Magpul MOE or others which lack that bump and have a fuller shape).
If you had a kit-supplied foregrip (some kits include a vertical grip you can attach to an M4 RAS or MOE handguard if you have the compatible one), it’s optional to use it. On a basic round handguard with no rails, you can’t easily attach a foregrip without an adapter.
Safety Note: A basic AR without fancy rails doesn’t have a ton of places to burn yourself except the barrel and gas block – avoid touching those after firing. Basic handguards protect you. If you have an exposed low-profile gas block under a free float, it will be under the handguard anyway. Stocks and grips generally aren’t heat issues, so there are no concerns there.
Intermediate: Furniture Upgrades and Accessory Mounts
Intermediate users often swap furniture to improve the rifle’s handling and adaptability:
- Stocks: Tons of aftermarket stocks exist. Choosing one depends on use:
- For a tactical/carbine build: Popular choices include the Magpul CTR or MOE (with friction lock to reduce wobble), B5 Systems SOPMOD stock (has cheek weld and battery storage), or BCM Gunfighter stock. These give better cheek weld, less rattle, and sometimes QD sling swivel points. Installation: typically, just like the basic stock – you pull the adjustment lever further (sometimes you must pull a pin down) to slide it off the buffer tube, then reverse to install new one. Pay attention if your buffer tube is mil-spec (1.14" dia.) or commercial (slightly larger 1.17"); most new stocks are mil-spec size.
- For a precision/DMR build: A fixed or adjustable stock with comb (cheek rest) and length settings is great. Magpul PRS is a top choice (adjustable comb height and LOP, but heavy). There are lighter options like Luth-AR MBA or even just an A2 fixed stock with a slip-on cheek pad. These often require an A2 length buffer tube (except PRS can go on carbine tube with adapter). If switching to a fixed A2 stock: you’d also swap buffer tube and buffer to rifle type – a bigger change. But possible at intermediate skill with the right parts (just follow a guide; ensure you get the rifle buffer and spring if doing that).
- Grips: Common upgrades include more vertical grips (for those who like a more straight wrist - good for shorter LOP or shooting squared stance). Examples: Magpul K2 grip (more vertical angle), the BCM Gunfighter (mod 0, 1, 3 sizes), Ergo grip (rubberized), Tango Down BG-16, etc. Many have storage core. Installation we already know – one screw. Just ensure to transfer the safety detent spring into the new grip’s hole. Pick a grip that fits your hand and corrects any discomfort you had with the A2.
- Free-Float Handguards: If your build started with basic drop-in handguards, moving to a free-float rail is a significant accuracy and accessory upgrade. It requires removing the delta ring and FSB which is more involved (especially FSB pins). Many decide to have a gunsmith do it, or if comfortable, you can cut off the delta ring carefully and use a low-pro gas block without removing the FSB pins by just chopping the FSB down to make a crude low-pro block (there are guides for “FSB shave”). But easier for intermediate: if you planned from start, you already used a low-pro gas block and free-float. We covered installation earlier. For those with existing clamshell: you can buy drop-in free float rails that don’t require removing the FSB. For example, Centurion Arms C4 rail splits and clamps on using the delta ring but still free-floats the barrel once installed – neat option. Or Magpul MOE SL handguards which aren’t free-float but do give M-LOK slots on a drop-in handguard (they still use the delta ring).
- Once you have a rail, you can attach lots of accessories via Picatinny or the modular systems (M-LOK being most popular nowadays). M-LOK and KeyMod allow direct attachment of sections or accessories without a heavy quad rail.
- Vertical/Angled Foregrips: Many shooters like a vertical foregrip (VFG) or an angled foregrip (like Magpul AFG) on the handguard to aid control.
- A stubby VFG can improve muzzle control in rapid fire and give a consistent hand stop. It attaches to Picatinny or has an M-LOK version.
- Angled foregrips provide a natural inclined surface to pull the rifle back into your shoulder.
- Installation: for Picatinny, slide on and tighten screw; for M-LOK, use the M-LOK screws and T-nuts to mount in desired slot (they come with instructions – basically insert at slot, turn screw to rotate lock, tighten).
- Ensure whatever you add doesn’t interfere with magazine changes or resting on support. Some competitions forbid vertical grips if not in certain divisions, check if that matters.
- Rail Covers/Panels: Free-float handguards can get hot after sustained fire. M-LOK and KeyMod have slim profiles which can be sharp. Adding rail covers or panels (like rubber or polymer inserts) can improve grip and protect your hand from heat. Many are textured for better grip (e.g., BCM rail panels, or ladders for picatinny).
- Sling Mounts: Upgrading your sling setup from the basic fixed loops to QD (quick-detach) swivels is worthwhile. Many stocks and rails have QD sockets built-in (e.g. the Magpul MOE SL stock has one, many rails have multiple). If not, you can add a QD socket via M-LOK attachment or a receiver end plate with QD hole.
- Two-point slings are the norm and recommended for versatility and steady aiming. For mounting: a good setup is front sling QD near the barrel nut or mid-rail (not at very end, to avoid snag and better weight distribution) and rear sling QD at the stock (either at rear or near receiver).
- Single-point slings attach at the receiver (e.g., via an end plate loop/QD) – they allow easy swapping shoulders but can let the rifle swing and hit you.
- There are also three-point slings (less common now) and fancy convertible ones. As intermediate, a good padded two-point adjustable sling (e.g. Blue Force Gear Vickers or Magpul MS1) is highly recommended. It lets you tighten the rifle to your body or loosen to engage targets quickly.
- Lights: A weapon-mounted light is essential for any defensive or all-purpose rifle used in low light. While not exactly “furniture,” it’s an accessory that attaches to handguard. Intermediate builders should plan a spot for a light – usually 10 or 2 o’clock on the rail (for right or left-handed) so you can activate with support hand thumb. There are many rail-mounted lights (Streamlight, SureFire, Cloud Defensive, etc.). Some require a section of Picatinny or use M-LOK direct mounts.
- Ensure it’s mounted far enough forward that barrel shadow is minimized but not so far that muzzle blast destroys it (most quality tac lights can handle it).
- A tape switch can be used for activation, mounted on top rail or side with M-LOK mounts. Manage the cable with clips or covers so it doesn’t snag.
- Bipods: If your use includes precision or bench shooting, a bipod is a great accessory. Attach via a rail segment or some handguards have a bipod stud or M-LOK bipod mounts (e.g., Harris bipod can attach to a stud, Magpul bipod attaches to M-LOK directly, etc.). For intermediate, adding a bipod can help in prone shooting stability but remember to remove or fold it if doing run-and-gun as it adds weight and bulk.
- Upgraded Iron Sights: You might replace a fixed FSB with folding front/rear sights (especially if you moved to low-profile gas block). Quality BUIS (Back-Up Iron Sights) from Magpul (MBUS), Troy, Midwest, etc. attach to picatinny rail on upper and front of handguard. Ensure your handguard is same plane as upper (most are). These give you emergency or co-witnessed aiming if your optic fails.
- Cosmetics: Intermediate builder might also choose furniture in different colors (FDE, OD green, etc.) for aesthetics or camo. There’s nothing wrong with making the rifle look cool as long as function is solid. Many brands offer color options. Just know that painted or colored parts might show wear differently.
Installing these upgrades mostly involves loosening screws or replacing parts, which we’ve covered in concept. Always ensure screws that hold critical accessories (like light mounts or foregrips) are tight and even secured with Loctite if they aren’t meant to move (i.e., use blue Loctite so you can remove if needed). Reconfirm zero on any sights if you change handguards or anything structural.
Comparison of Different Stock and Grip Setups. Here are four AR-15 lower assemblies side by side, each with different stocks and grips. Note the variations: a basic M4-style collapsible stock vs. an upgraded B5 SOPMOD stock (with cheek pad), standard A2 grip vs. Magpul MOE grip, etc. Swapping furniture allows you to tailor ergonomics and is a common intermediate upgrade.
Expert: Fitting the Rifle to Shooter and Special Accessories
At the expert level, furniture choice is about fine-tuning ergonomics for a specific shooter or mission:
- Customized Length of Pull and Cheek Weld: An expert might measure their ideal length of pull (distance from stock to trigger) for various shooting positions and adjust stock accordingly. For example, with body armor you might shorten LOP; for prone precision you might lengthen a bit. Stocks like the Magpul PRS or Luth-AR MBA allow incremental adjustments – experts will set those to exact comfort, even mark their positions for different scenarios.
- Balancing Weight Distribution: If a rifle is front-heavy (like with a suppressor or heavy barrel), an expert might counterbalance by using a heavier stock or adding weight to the rear (there are stock weights you can insert). Conversely, if needing to reduce overall weight, they might choose a minimalist stock (like Mission First Tactical Minimalist or even a simple buffer tube with foam pad for ultra-light builds) and lightweight grip (there are skeletonized aluminum grips for extreme lightweight ARs). They might even trim parts or use titanium components to shave ounces.
- Recoil Management: Although AR-15 in 5.56 doesn’t recoil much, for speed shooting an expert might add things like a recoil pad or use stocks with built-in soft recoil pads (e.g., Limbsaver pad on a stock) for continuous fire comfort. Also, they pay attention to how the stock’s buttplate fits their shoulder pocket – e.g., some stocks have a slight angle (like the USGI stock is angled). A straight vs angled butt can affect how muzzle climbs. Some like an angled butt so when prone it naturally pushes into shoulder; others prefer straight for consistent alignment.
- Sling Techniques: Experts practice advanced sling use – like using the sling as a shooting support (hasty sling or loop sling to steady aim). If so, they may prefer certain sling swivels (e.g., a cuff sling set up) or a quick-adjust sling that they can cinch very tight. They might add multiple sling attachment points on the rifle to configure differently for different shooting (some competition shooters have a sling attach near the receiver for carrying, and another up front for marksmanship support).
- Night Vision and IR accessories: For those at the high end, say doing night operations or hog hunting with NV, you need somewhere to mount IR lasers/illuminators (like PEQ-15, MAWL, etc.). That typically requires a stable handguard that holds zero for lasers – so a monolithic upper or an extremely rigid rail (Geissele, Knights Armament) is used. Experts will mount their IR laser and zero it carefully. They often also add a pressure switch that can activate both white light and IR devices seamlessly. Cable management becomes crucial – they’ll route and secure cables with covers or channels.
- Heat Management: Experts who run high round counts might consider heat dispersion in their furniture choices. Aluminum free-float rails get hot quicker than polymer guards but also cool faster. Some will run rail covers that are insulative (like XT panels or the new HTP covers) so they can hold the rifle after many rounds.
- Durability and Rigidity: In harsh environments, flimsy or cheap furniture can fail. Experts usually stick to proven brands (e.g., Magpul stocks, not a $10 knockoff that might collapse under stress; good grips that won’t crack). They also ensure their handguard attachment is rock-solid (many expert-chosen rails have anti-slip mechanisms, like a Geissele rail with 6 bolts and tabs that interlock with the upper – it won’t shift zero or loosen easily).
- Breach and CQB considerations: If building for close quarters or tactical use, an expert might choose a shorter stock (or a folding stock adapter, though ARs require an adapter that allows one shot then needs re-opening unless using special bufferless systems). They might also consider a PDW stock – those ultra-short stocks with collapsible struts (reduces LOP greatly for transport). They require special buffer systems. It’s an expert move to integrate those reliably.
- Alternate Materials: We see polymer handguards, but also carbon fiber ones in high-end builds for weight savings (e.g., Lancer makes carbon fiber free-float tubes). They are very rigid and light, good for competition – an expert might use that to shave weight for a run-and-gun rifle.
- Fine Tuning Pistol Grips: Some expert precision shooters use grips with a specific angle or palm shelf (e.g., target style grips) to ensure consistent hand placement. They might even modify a grip with filler or putty to custom fit their hand like competition pistol shooters do.
- SBR/Pistol Braces (legal changes): At time of writing, braces have been legally contentious. But historically, experts building AR pistols (for non-NFA <16" use) chose braces that gave best ergonomics (like SBA3, SB4 braces, or Tailhook). These essentially act as stocks. With legal changes, many may SBR the lower properly (Form 1) and then just use actual stocks. The point is, for very short builds, experts weigh the trade-offs: compactness vs shootability. The shorter the barrel/rail, the less space for support hand, etc. They might use a handstop or mini grip on a short barrel to ensure they don’t accidentally place hand in front of muzzle.
- Multiple Grip Angles: One nifty expert trick: some will mount a slight angled foregrip in addition to a vertical. For example, a short vertical grip as a handstop and an angled grip to further improve wrist angle. This is personal preference. (Be mindful of legal overall length and not creating an AOW by weird combinations – under 26" and a vertical grip is a no-no unless pistol, etc. But with braces vs stocks rules, this gets complicated).
- Removal of Unnecessary Items: Experts also trim what’s not needed. If a sling mount is unused, they remove it to reduce snag. If a rail section is unused, they cover it or remove to reduce weight and profile. It’s all about sleek functionality. They might even smooth out sharp edges on a handguard or trigger guard area that could rub during long use.
- Painting/Camouflage: Furniture often is the colored part of a rifle. Experts who operate in varied terrains may paint their rifles for camouflage. This often includes painting the stock, grip, and handguard. It’s cosmetic but also functional (breaks up outline). Doing it expertly means using proper techniques so it doesn’t gum up moving parts and using paints that can handle some heat (for handguard area). Many rattle-can jobs suffice. Some experts use tape or wrap (like camo form tape) temporarily.
Furniture/Accessory Build Examples – Budget vs. Premium
Let’s illustrate how furniture choices differ:
- Budget Furniture Example: The standard kit parts – M4 stock, A2 grip, plastic handguards – are actually very functional and incredibly affordable (often essentially “free” with kits or ~$50 total for all). They are durable (the military used them for decades). They lack adjustment or fancy features but they work. A GI nylon sling ($10) could be your sling solution. No vertical grip or anything. Perhaps you mount a basic $40 LED light with a universal barrel mount (clamped on the FSB) – a bit unwieldy but it gives white light.
- Mid-tier Furniture Example: You upgrade to Magpul across the board: e.g., Magpul MOE SL stock ($60, has good lock and QD mount), Magpul MOE+ grip ($25, rubberized feel), Magpul MOE SL handguard (if keeping FSB, $40) or an M-LOK free-float ($150). Add a Magpul MVG vertical grip ($20 attaches to M-LOK) and rail covers ($20). A two-point sling like the Vickers ($50) with QD swivels ($15 each) on a Magpul QD end plate ($30) and built-in socket on stock. Maybe add flip-up rear sight (Magpul MBUS $50) to complement the FSB. Weapon light mid-tier like Streamlight Protac Rail Mount ($120) on an M-LOK mount ($15). This whole suite maybe adds about $400 in furniture/accessories. The rifle now handles better: the stock is tighter and more comfortable, grip fits hand nicely, sling is quick-adjust, the light is reliable and bright, and the foregrip helps with control.
- Premium Furniture Example: High-end choices: a stock like the B5 Precision or Magpul UBR ($150-$200) – extremely solid with fixed-cheek, great for both prone and standing as it balances weight. Or if a sniper-style build, Magpul PRS Gen3 ($250) which is rock solid and micro-adjustable. A grip like the Ergo Deluxe or a target grip ($40-$80) that perfectly fits your hand contour. A handguard like Geissele MK8 or Knights URX4 ($300+) that is proven in combat, with zero shift and built-in rail sections where needed. Add panels like RailScales G10 panels ($20 each) which also look great and insulate. Maybe a foregrip from Unity Tactical or Bobro that also doubles as a barricade stop ($100). Sling could be a padded VTAC or a specialized quick-release sling ($80). Possibly a $300 weapon light/laser combo (SureFire M600 Dual Fuel + a Steiner DBAL for IR, if NV use – though lasers are another tier of accessory beyond basic).
- The premium setup can easily have $1000 in accessories on the gun. It will feel very refined – e.g., the UBR stock gives a consistent cheek weld akin to a fixed stock but is adjustable and extremely tough; the PRS lets you sit on a sandbag with perfect eye alignment to scope. It’s more about tailoring for ultimate performance in a niche (either precision or tactical). For general plinking, this is overkill, but for an expert, those increments matter.
Bottom line: Furniture and accessories are where you personalize the rifle. You can always start simple and add as you learn what you need. A common recommendation is don’t add every gadget at once; shoot the rifle, identify what could be improved (grip comfort, sight picture, weight, etc.), then upgrade accordingly. It’s easy to overspend on cool parts that you might not actually utilize fully. But certainly, invest in a good sling and light if using defensively – those are non-negotiable for serious use.
Next, with the rifle assembled and kitted out with furniture, we should discuss Optics and Sights, since aiming is critical and there are many options to equip your AR-15 for sighting targets accurately.
Optics and Sights
The AR-15’s modular design allows a wide array of sighting systems: from traditional iron sights to red dot reflex sights, holographic sights, magnified scopes, and more. In this chapter, we’ll explore how to choose and mount sights or optics for your build, and how to zero them (sight them in) effectively. We’ll also discuss co-witnessing (aligning iron sights with optics) and maintaining zero.
By experience level:
- Beginner: Likely starting with iron sights or a simple red dot sight. We’ll cover basic zeroing procedure at common distances, and how to mount a red dot or scope properly without specialized tools.
- Intermediate: Upgrading to better optics such as LPVOs (Low-Power Variable Optics, e.g., 1-6x scopes) or magnifiers behind red dots, exploring different zero ranges (25m vs 50/200m vs 100m) and their trajectories. Possibly using backup iron sights in conjunction with optics (co-witness or offset mounts).
- Expert: High-end optics like ACOGs, thermal scopes, or high-magnification scopes for precision, and fine points like adjusting eye relief, parallax, using ballistic reticles or turrets, and making sure the mounting hardware is torqued properly and maybe even using bubble levels on scopes. Also, quick-detach mounts and maintaining return-to-zero.
Beginner: Iron Sights and Red Dots
Iron Sights: If your rifle has a fixed front sight post (A2 FSB) and either a carry handle rear or a flip-up rear, you have a classic iron sight setup. Key points:
- The front sight post is adjustable for elevation (moving point of impact up/down). The rear sight is typically adjustable for windage (left/right) and maybe elevation too (like on an A2 carry handle drum for distances).
- A common zero for irons is 50 yards or 25 meters for military M4 (which then also correlates to ~300m battlesight zero). Simpler: many zero at 50 yards because it yields a second intersection around 200 yards, which is flat shooting to about 250 (for 5.56).
- To zero: you’d shoot a group at 25 or 50 yards, see where it hits relative to aim (for instance, at 25m, the point of impact should be a bit low compared to aim if using the small aperture, because it’s set for 300m zero typically). Adjust front sight by pressing down detent and rotating post (each click ~1.25 MOA on an FSB at 100 yards). Adjust rear for windage (each click usually 0.5 or 0.75 MOA). Iron sight zeroing can be a detailed topic – consult a specific zero target or guide for “Improved Battlesight Zero” which often uses 50/200m zero.
- Many beginners find irons challenging at first – the sight picture is your eye focusing on front sight with target blurry and rear blurry. It’s good practice to learn, and irons are reliable (no batteries). Keep your iron sights even if you add an optic, as backups.
Red Dot Sights: A very popular beginner optic is a red dot sight (RDS) – like an Aimpoint (high-end) or a budget friendly like Sig Romeo5, Holosun, etc. Red dots offer fast target acquisition with both eyes open. Key mounting tips:
- Mount the red dot on the top rail of the receiver, not on the handguard (unless you have a one-piece monolithic rail), because the receiver is solidly mounted to barrel; the handguard might flex. So, keep optics on the upper receiver for stability.
- Many red dots use a Picatinny rail mount. Some come with an integral mount, others you attach via rings or mounts. For AR-15, you typically want the dot to be at “absolute co-witness” or “lower 1/3 co-witness” height relative to iron sights:
- Absolute co-witness: The dot when you look through will align with your iron sights (center of optic equals tip of front sight when irons are up). That means mounting the dot at about 1.41 inches above rail (most Aimpoint mounts for AR).
- Lower 1/3 co-witness: The dot sits slightly higher (1.5-1.6 inches above rail), so when you use irons, you see them in lower third of the optic window. This gives an uncluttered view normally (irons low out of way) but irons are usable by dipping head a bit. Many prefer this for a clearer sight picture with the dot, and you can still use irons if needed by changing cheek weld slightly.
- Many entry-level red dots come with two mounts or spacers to choose these heights. Pick one, typically lower 1/3 is nice.
- Mounting procedure: Loosen the mount, place on rail (usually top rail of receiver, roughly over the delta ring area or a bit forward – not too far back to avoid tunnel vision, but not on the free-float unless it’s extremely solid). Ensure it’s sitting fully in a rail slot (some mounts have a cross-bolt that fits into a rail slot). Then tighten the mount screws or knob. If you have a torque value, use it (often ~20-30 inch-lbs. for optic mounts). Otherwise, snug by hand plus a small additional tweak – do not over-tighten cheap mounts as threads can strip. Use blue Loctite if it’s a screw that might vibrate loose.
- Turn on and Zero the Red Dot: Usually set brightness such that dot is clearly visible but not starbursting too much. To zero, it’s like zeroing a scope: use the windage and elevation turrets (often require a small screwdriver or coin). A typical dot has adjustments like “1 click = 0.5 MOA” or maybe 1 MOA. Check manual. Zero distance: Many do 50 yard zero for AR-15 (for same reasons as irons) or a simpler 25 yard zero if indoor, but 50 is recommended for flattest trajectory out to 200+. With a 50/200 zero, the dot will be about ~1.5-2 inches low at 25 yards (due to sight over bore height). If only 25y available, you could zero roughly 1.5” low at 25y to get close to 50y zero, then fine-tune later at 50/200.
- Co-witness usage: If you have backup irons installed too, check alignment. For absolute co-witness, if irons are zeroed and you put dot on and zero it, the dot may rest right on the front sight tip when co-witnessed. Ideally, you don’t want to constantly use both – either use dot alone (looking over irons or with rear flipped down), or if dot fails, flip up irons and use through the glass. They should align if everything is consistent.
- Parallax and Eye Relief: Quality red dots are near parallax-free – meaning the dot stays on target even if your eye moves a bit behind the sight. There’s no eye relief concerns (you can hold an Aimpoint at arm’s length and still see the dot). So red dots are very forgiving about position; just get a comfortable spot on rail that is easy to pick up the dot quickly (often above the magwell or a bit forward). Too far forward shortens effective window (looking through a tiny window further away). Too far back can encourage focusing on the dot instead of target. Many end up mounting red dot about halfway down the upper receiver rail.
- Battery Maintenance: Beginner tip – turn off your red dot when done (unless it’s one with years-long battery life or auto-off). Keep a spare battery in your grip or stock compartment. An “always on” dot like Aimpoint or Holosun Shake-awake is great – you might replace battery yearly on your birthday or something as routine, to ensure it doesn’t die when needed.
Holographic vs Reflex: At beginner stage, both basically function similarly for use (a holographic sight like EOTech has a reticle that is hologram, vs reflex like Aimpoint uses an LED reflection). For user, both project a reticle seemingly at target distance. Holographics use more battery and have fuzzier reticle sometimes but allow finer center dot (1 MOA). Reflex LEDs have crisp dots usually. Either is fine – focus on reliability and battery life at this stage.
Maintaining Iron Sights: If you have flip-up irons, they need to be solid. Tighten their mounting screws properly. When flipping, ensure they lock (if they have a lock, engage it). If you drop the rifle or bump sights, re-check zero if you suspect misalignment – they can get knocked off if hits hard, especially cheaper polymer ones.
Zeroing irons and red dots can be done at the same time: if you have both, you might zero irons first, then adjust the red dot to the same POI, then fine tune adjust the dot.
Intermediate: Magnified Optics, Zeroing Techniques, and Mixing Sights
As you progress, you might want to engage targets at longer ranges or with more precision. Intermediate optics include:
- LPVO (Low Power Variable Optic): e.g., 1-4x, 1-6x, 1-8x scopes. These give you a true 1x (almost like a red dot with slight eye box constraint) plus the ability to zoom for distance. Popular for ARs because at 1x with both eyes, it’s fairly fast (though not quite as forgiving as a red dot), and at higher mag you can PID targets or shoot accurately at 300-500m.
- Mounting an LPVO: Usually with a one-piece cantilever scope mount on the upper rail. Eye relief matters (about 3-4 inches typically). Set the scope in mount loose, at 1x magnification, shoulder rifle with eyes closed, open eye – adjust scope forward/back until sight picture is full without black edges. At higher magnification, check again (eye relief can change slightly at max mag). Once good, level the scope reticle (you can use a small bubble level or level it relative to rifle by aligning horizontal crosshair with some known level reference like the flat top rail or a plumb line for vertical). Then torque the scope ring screws evenly (common spec ~15-20 inch-lbs., depends on mount).
- Zeroing: Many LPVO reticles are set for 100 yard zero (like if they have BDC marks, often assuming 100). You can zero at 50 or 100 depending on what the reticle is calibrated for. If it’s a simple duplex or red dot in scope, 50/200 can still work. Many choose 100 for simplicity on scopes.
- Note: LPVOs often have an adjustable diopter (focus) – set that for a sharp reticle to your eye before zeroing (point at sky, adjust until reticle is crisp).
- ACOG (Fixed power prism scope): e.g., Trijicon ACOG 4x32, famous military optic. Fixed 4x, bright reticle, no battery (tritium+fiber). These are intermediate/expert optics. They have specific mounting and eye relief (very short ~1.5"), and a specific zero (usually 100m with reticle calibrated out to 800m). If you use one, follow the manual for zero (often aim at tip of chevron at 100).
- ACOGs can be used with “Bindon Aiming Concept” – both eyes open, one eye sees magnified, the brain merges images – somewhat works but not as fast as red dot at CQB. So, some pair an ACOG with an offset red dot or use the top-mounted mini red dot for close range. Intermediate user might try this.
- Magnifiers behind Red Dots: A cheaper alternative to an LPVO: keep your red dot, add a flip-to-side 3x magnifier (like EOTech or Vortex models). This gives some magnification for mid-range.
- Mounting: magnifier goes on the rail right behind the red dot, on a flip mount that usually raises it to same height as the dot. Ensure alignment so the dot is centered in magnifier when you look through – you can adjust some mounts for windage/elevation centering. It should not change the actual zero, just enlarge the view. Eye relief on these ~2-3 inches, so mount accordingly.
- Use: Flip it aside for 1x, flip in place for 3x. It can help you see targets at 100-200 better, but comes at weight and slight optical quality cost. Also, at 3x, any dot’s imperfections or parallax shift become more noticeable (most red dots are fine but you might see slight shift).
- Different Zeroing Strategies: Intermediate shooters might experiment:
- 50/200 zero vs 100 zero vs 36-yard zero (some use 36y to mimic USMC 300m BZO) vs 25.
- Generally, 50y zero is popular for red dots because it gives a point-blank range out to ~225 yards (meaning within about +/-2” of line of sight from 0 to 225y).
- 100y zero is typical for scopes and many BDC reticles. Simpler if you dial elevation or holdover, as you know point blank maybe out to ~150y is only couple inches low.
- At intermediate stage, it’s key to understand ballistic trajectory: a 5.56 round from an AR, with sights ~2.6" above bore (with optic), will cross line of sight around 36y (on way up), be about 2" high at ~150y if 36/300 zero, and again intersect at 300y. With 50y zero, it crosses at 50, reaches ~1.5-2" high around 100-150, and falls back through line at ~200. With 100y zero, it’s 2" low at 50 (since still rising), about 3-4" low at 200. Each has pros/cons.
- Consider what distance you anticipate needing a direct hold on target. For many, 50/200 is a good compromise.
- Using Backup Irons with Optics:
- Co-Witness: If you have a red dot, you might co-witness as discussed. This means if dot fails, turn it off and use irons through the same plane.
- Flip-up Irons with Scopes: Usually you mount flip irons front and rear that fold flat under the scope’s view. If scope goes down, you remove it (ideally QD mount), flip up irons.
- 45-degree Offset Sights: Some intermediate/advanced users mount small iron sights or a reflex micro-dot at a 45° offset on the handguard or receiver. This allows using a secondary sight by canting the rifle, useful if primary optic is high magnification and a target is very close. It avoids having to detach anything. Example: a 1-8x scope on top, and a little MRDS (mini red dot) on a 45° offset mount for CQB.
- If using offsets, practice transitions (it’s a slight tilt of rifle, but need to get used to different cheek weld or head tilt).
- Mounting and Torque Intermediate: If you have multiple optics, quick-detach (QD) mounts can be nice to swap them. Good QD mounts (LaRue, ADM, Bobro) return to zero within ~0.5 MOA or better if you re-attach at same slot with same tension. This allows for example: running a red dot for drills, then switching to a scope for a competition stage. Keep track of which rail slot you zeroed in and try to go back to it. Use witness marks if possible (like pencil mark on rail).
- Scope Ring Lapping and Leveling: At intermediate maybe not needed, but if you find scope ring marks or slight stress on tube, one might lap rings with a bar and compound to ensure full contact. Also, ensure you leveled scope reticle properly – an un-level scope means your bullet will drift when you dial elevation or hold, because reticle isn’t vertical. There are leveling kits (expensive) or garage methods like a plumb line.
- Optic Quality and Budget: Intermediate users start noticing differences: cheaper scopes might have edge blur, less light transmission, inconsistent eye relief, or don’t hold zero after many shots (especially on heavy recoil, not an AR issue as much). It’s often said “spend as much on optic as on rifle” for precision rigs. For general AR use, a decent $150-$300 red dot or $300-$600 LPVO can serve well. Premium optics (Aimpoints, EOTech, Trijicon, Nightforce, Leupold etc.) often just give more durability, clarity, and features (like true 1x, daylight bright reticle, better eye box). Choose what fits your need and budget; just avoid the bottom-of-barrel $30 Amazon optics – they often fail or lose zero easily. Mid-tier like Vortex, Primary Arms, Sig, etc., are often great for starting.
- Zero Confirmation at Distance: With intermediate skill, you should confirm zero not just at short range, but how it hits at extended ranges. If you zeroed at 50, check at 200 where it should be zero again (or ~1-2" low depending on trajectory). If you plan to shoot 300+, maybe zero at 100 and learn holdovers or dial for drop. Many scope reticles have holdover marks – test them on known-distance targets (e.g., if it says 400m mark, try at 400 if you have the chance). This builds confidence in using your sights effectively.
Expert: Advanced Optics Use and Extreme Accuracy
Experts often push the envelope with optics:
- High-Magnification Scopes: For precision ARs (like SPR style or varmint rifles), mounting a 2.5-10x, 4-16x, or even higher power scope with large objective (50mm) for long range shooting. At 600+ yards, 5.56 drop and wind matter a lot – experts use scopes with tactical turrets to dial elevation and windage, and possibly FFP (First Focal Plane) reticles so holdovers are accurate at any zoom.
- Scope mounting here is critical; they often use cantilever mounts with MOA cant (like a 20 MOA base to give more elevation range for dialing). Reticle leveling must be spot on or dialing will introduce windage errors.
- They might use bubble levels on the scope to ensure rifle isn’t canted when shooting (a small anti-cant device, because a slight rifle tilt at long range can throw shots off).
- They log their DOPE (Data on Previous Engagements) – basically bullet drop at various ranges with their exact setup, often using ballistic calculators and confirming in real life.
- Ballistic Calculators and Ranging: Experts using magnified optics might incorporate a laser rangefinder to know target distance and then dial or hold accordingly. Some high-end scopes have ballistic reticles tailored to specific ammo (like an ACOG’s BDC is for M855 62gr at certain velocity). Experts validate if their ammo matches that or adjust accordingly.
- Night Vision and Thermal Integration: An expert tactical user might mount a clip-on night vision or thermal in front of their day scope (requires day scope with parallax adjustment and known compatibility) or use dedicated NV optic. Aligning those and preserving zero is advanced. For example, an AN/PVS-22 universal night sight attaches to rail forward of scope – an expert ensures rail is true and the device is factory bore sighted to minimal shift. They also might have an IR laser zeroed for shooting with night vision goggles head-mounted (that’s a whole discipline – zeroing lasers and offset for NVG height).
- Alternate Sight Picture Techniques: For CQB with a magnified optic, experts practice shooting both eyes open even at some magnification, or using the Bindon concept for ACOGs. They might have a finely tuned offset red dot at 45° for <25m targets and know exactly how to transition rapidly.
- Rapid Adjustment & Holds: An expert marks their scope dials (or uses zero stop turrets, etc.). They might have custom turret labels made (e.g., from Kenton Industries) that have yardages marked for their load. Then they can just dial to 300 or 500 without remembering clicks. They intimately know their holds – e.g. "at 300, I hold one mil high if I can’t dial," or "with 50y zero, at 5 yards I need to hold 2 inches high to hit headshots due to mechanical offset" – yes, at very close range, bore is ~2.5” below sight, so an expert remembers to compensate for that in certain scenarios.
- Scope/Optic Reliability: Experts often stick with proven optics that can take abuse (drop, temperature, etc.). They may have seen cheap ones fail and will invest more to avoid that in serious applications. They also possibly keep backup methods – e.g., even with a fancy scope, they’ll keep those irons zeroed and practiced.
- Cleaning and Maintenance: They take care of lenses – use proper lens cleaning tools (brush, microfiber, solution) to avoid scratches. Cheap coatings can scratch easily. They ensure no oil or dirt remains that can distort view (especially on red dot emitter lenses).
- Optics on Multiple Uppers: If an expert has multiple uppers or rifles, they sometimes move optics around. They might use a system like recording the zero offsets. Or they just buy more optics per rifle, but sometimes an expensive scope might be shared. If so, they’ll note that e.g., on Rifle A zero is X clicks off from Rifle B, etc. Usually not ideal – better to have each optic dedicated and zeroed to its rifle.
- Emerging Tech: Possibly using things like smart scopes or range finding scopes (like the Burris Eliminator or newer electro-optics). This is new frontier where scope calculates drop and gives an aiming point. Experts test those but often stick to manual skills since electronics can fail. However, things like the SIG BDX system (rangefinder communicates to a scope to illuminate the hold point) might become more common and an expert will know how to exploit that while still understanding fundamentals.
- Iron Sight Mastery: As an aside, an expert sharpshooter can still use iron sights to impressive distances. Some service rifle competitors shoot irons at 600 yards with great effect. They know how to adjust the sight drums precisely for specific distances and wind. They also may modify irons: e.g., a finer front sight post or smaller rear aperture for precision (the trade-off is needing bright light). Some use an aperture insert with a diopter lens (like the Shooting Sight SR micro sight) to sharpen front sight focus for aging eyes. This is beyond typical but shows how even irons can be refined.
- Switch-Barrel or Multiple Zeros: If an expert has a setup with, say, two barrels/calibers for one rifle (like a .223 and a .300 BLK upper sharing an optic maybe via QD), they might have marked zero settings for each. E.g., dial 8 clicks up and 2 right when switching to the other upper, etc. However, that’s tricky and seldom perfectly repeatable; usually separate optics or re-zero each time is needed.
Optics Build Examples – Budget vs. Premium
- Budget Optic Setup: Use Magpul MBUS sights ($80 for set) as primary or backup. If budget allows, add a simple red dot like a Bushnell TRS-25 ($70) or Sig Romeo5 ($120). Mount on the receiver with included high mount for co-witness. This gets you on target fast out to 200 yards easily (dot size usually 2-4 MOA, good enough for ~4” at 100, which is fine). No magnification, so identifying small or far targets is harder, but you can hit torso at 300 with practice by holding over (roughly the dot height above head for 300-yard target with a 50 zero).
- Many budget builds skip optics initially and stick to irons until they can afford better – which is fine for learning fundamentals. Or they go for a low-cost 3-9x40 hunting scope ($100) if their goal is bench shooting, but those often have less ideal eye relief and durability on an AR platform (and may not focus parallax at 100 properly if rimfire model, etc.). Better a solid red dot than a wobbly cheap scope.
- Mid-Range Optic Setup: A quality 1-6x LPVO like Vortex Viper PST ($600) or Primary Arms 1-8x with ACSS reticle ($400) in an Aero Precision or Burris PEPR mount ($80-100). This gives both eyes open at 1x reasonably and zoom for distance. Pair with flip-up BUIS for backup. Possibly also a micro red dot offset if competition use (some 3-gunners do 1-6x scope plus a 45° dot for speed on close targets). That offset might be a Burris Fastfire or Holosun ($200).
- Alternatively, an Aimpoint PRO red dot ($400, very rugged) with a 3x magnifier ($300) is a mid-level versatile combo. Aimpoint you can leave on for 3 years (literally), always ready. Magnifier flips for when needed. This is slightly heavier than a single LPVO but easier to use for beginners in close range.
- Both setups are around $600-800 total. They vastly improve hit probability at range and target acquisition. E.g., with 6x, you can engage 400-500 yards targets confidently if you know drop.
- Premium Optic Setup: Perhaps a Nightforce NX8 1-8x ($1750) or a SIG Tango6T (military’s new LPVO) with illuminated first focal plane reticle, in a Geissele or Spuhr mount ($300). Incredibly durable, bright, with ranging reticles. Or a Trijicon ACOG 4x ($1000) plus RMR on top ($500) – giving fixed 4x with illuminated reticle (tritium/fiber) and a reflex sight for CQB. These are combat-proven and bomb-proof.
- For a designated sharpshooter rifle: a Leupold Mark 5HD 3.6-18x ($2000) with Horus reticle, allowing dialing and holding for wind precisely, maybe on a semi-auto precision AR (like an Mk12 mod 1 clone). This plus a really good mount (Badger Ordnance or Geissele) yields near bolt-action capability out of an AR.
- At the very high end, perhaps add a Clip-on NV like PVS-30 ($10k, beyond most civilians) for night shooting, or use top-tier thermal scope ($5k+). Those are specialized but show the extremes of AR setup.
- A more common "premium" might just be an Aimpoint T2 micro red dot ($700 with mount) – extremely light, tiny, but tough – on a home defense AR, paired with good BUIS and a powerful tac light, this is ultra-dependable and fast.
At expert level, one key skill remains: practice. The best optics won’t automatically make you accurate – you need to confirm zero, practice transitions, and maybe even do drills where you simulate optic failure and use backups.
Now that our AR-15 is built, accessorized, and sighted in, we should prepare for the inevitable: things can go wrong. In the next chapter, we’ll address Troubleshooting and Maintenance – how to keep your AR running smoothly, identify and fix malfunctions, and properly maintain it for longevity.
Troubleshooting and Maintenance
Even a well-built AR-15 can encounter issues, and routine maintenance is necessary to keep it reliable. This chapter covers common problems and malfunctions, how to troubleshoot them, and best practices for cleaning and maintaining your rifle. We’ll break it into skill levels:
- Beginner: Basic cleaning steps, lubrication points, and how to clear simple malfunctions (like misfeeds or failure to fire) if they occur. We’ll discuss the importance of a break-in period and inspection of the rifle before and after shooting.
- Intermediate: Diagnose more complex malfunctions (double feeds, failure to eject, bolt not locking, etc.), and tune the rifle’s reliability (maybe adjusting gas or buffer, or replacing springs) if needed. Also cover wear inspection (bolt lugs, gas rings, etc.) and part replacement schedules (like when to replace a bolt or spring).
- Expert: Detailed troubleshooting for less common issues (light primer strikes, accuracy issues due to bedding or barrel whip, etc.), advanced cleaning techniques (like bore lapping, chamber polishing), and perhaps customizing maintenance schedules for high-round-count use or competition. We’ll also mention spare parts kit recommendations and field repairs an expert might handle.
Beginner: AR-15 Cleaning, Lubrication, and Basic Malfunctions
Initial Inspection and Break-In: After building, give the rifle a thorough once-over:
- Verify all pins (takedown, pivot, trigger pins) are seated and won’t walk out.
- Check that the gas block is still aligned (if set-screws, they shouldn’t have moved).
- For break-in, some like to fire a single round first (with an empty mag) to ensure it locks back – this confirms gas and cycling. Then fire a few more and examine spent brass for any alarming signs (deep gouges, bulges – usually fine if build was right).
- For barrel break-in, opinions differ. Many feel modern barrels don’t need special break-in beyond “shoot and clean normally.” Some will shoot one, clean, for first 5 shots, then shoot 5 and clean, etc., to smooth the bore. It’s optional and mostly for precision barrels. For chrome-lined or nitride barrels, break-in doesn’t significantly change anything – just shoot.
Basic Field Strip for Cleaning: After shooting (or when new to remove factory preservatives):
- Separate Upper and Lower: Push out rear takedown pin (you can leave front pivot pin engaged or remove it too to fully separate). Pull charging handle and remove BCG from upper.
- Disassemble BCG: Remove firing pin retaining pin (small cotter pin on side of bolt carrier), tap out firing pin (it will drop out back). Rotate the bolt cam pin 90° and pull it out. Then pull the bolt forward out of carrier. That’s as far as you need to strip for basic clean.
- Clean Bore: Attach bore brush (of correct caliber, .22) to rod, or use a bore snake. With upper separated, from chamber end, run a solvent-wet brush through barrel a few times. Then patches until they come out fairly clean. Use a chamber brush (bigger brush that fits chamber lugs) with solvent to scrub chamber if dirty (especially if using dirty ammo). Follow with a dry patch to remove solvent. You can lightly oil a final patch for storage to prevent rust, but pull it through once so not too much oil remains (excess oil in bore can cause pressure issues on first shot).
- Clean Bolt and Carrier: Use a nylon or brass brush to scrub carbon off the bolt, especially the tail end (it will get black and crusty). The bolt tail doesn’t need to be white-glove clean; some carbon will be in the grooves – that’s ok. Wipe the bolt body, lugs, and bolt face (ensure extractor is clean under it – you can brush around it, or pop out extractor by removing its pin if needed, but not required every time). Clean inside the carrier – cotton swabs or a dedicated carrier brush work (also a 20ga shotgun bore brush fits well). Ensure the firing pin is wiped clean. Clean the inside of the upper receiver, especially the locking lug area and feed ramps – cotton rag or chamber mop.
- Lubrication: ARs like to run “wet” (with lube). Key points to oil:
- Bolt: put a few drops of quality gun oil on the bolt itself, smear on the bolt lugs, and especially the bolt’s gas rings. They need lube to seal/move smoothly.
- Inside carrier: a drop in the carrier where the bolt rides, and on the cam pin.
- Bolt Carrier’s sliding surfaces: the four rails (two on each side) that contact the upper. Put drops there and spread. Also, a bit on the bottom where it rides over hammer.
- Charging handle: a light wipe on its rails.
- Trigger: a drop on trigger sear contact and hammer where they rub, though many LPK triggers come with a grease there. Don’t overdo or it may attract debris, but a little is good.
- Do NOT oil inside the firing pin channel or the face of bolt (leave firing pin clean and dry).
- Buffer spring: wipe with oily rag to prevent rust and noise.
- External: wipe down steel parts (barrel exterior, etc.) with a lightly oiled rag for corrosion resistance before storage.
- Reassemble: Bolt back in carrier (remember to insert bolt, align hole, cam pin in, then firing pin, then retaining pin). Ensure gas rings are staggered (though not critical, it’s habit). BCG into upper (with charging handle). Reattach upper/lower.
Lubrication Frequency: Apply oil before each shooting session if possible, especially on bolt. AR can run quite dirty as long as it’s well-lubed. A common cause of malfunction is being too dry.
Basic Malfunctions and Clearing:
- Failure to Feed (FTF): You pull trigger, hammer drops, but no boom – either no round was chambered or a misfeed occurred. Often caused by magazine issues or bolt not cycling fully.
- Tap, Rack, Bang: Standard drill. Tap the magazine to ensure it’s seated, rack (pull charging handle fully to eject any misfed round and chamber a new one), and attempt to fire again. This resolves many basic stoppages.
- If you find a round stuck (like partially feed or nose-dived), you might have to drop the magazine to clear it first, then cycle the action to clear the chamber, then reinsert mag.
- Failure to Fire: You get a click, but no bang and a round is chambered. Possible light primer strike or bad ammo. Wait a few seconds in case of hang fire (safety). Then tilt rifle, pull charging handle to eject the round, inspect primer. If it has a firing pin dimple but didn’t go off, it’s likely bad ammo (try new round). If it consistently happens, could be light strikes (maybe hammer spring not installed right or primer extremely hard). Beginners mostly just cycle and continue.
- Failure to Eject (Stovepipe): Case gets stuck partially out of ejection port, usually vertical or 45°, bolt tries to feed next round but spent case is stuck. Clear by removing the mag, if possible, rack the charging handle to pull bolt back (often will yank the stuck case out or at least free it, possibly falling out). You may need to reach in and pluck the case. Causes: underpowered ammo or extractor/ejector issue. Ensure rifle is clean/lubed and try different ammo. If frequent, have a gunsmith or intermediate do deeper check (extractor spring might need upgrade).
- Double Feed (two rounds trying to chamber): This is a bit more complex jam. Often one live round partially chambered and another trying to push up behind it.
- Remedy: Lock bolt back if possible (often hard because of jam). Strip out the magazine (you may have to yank hard). Then rack the charging handle to clear the loose rounds (they should fall out). You may have to manually pluck them. Once clear, reinsert mag (or better, swap to fresh mag) and charge. Causes: weak mag spring or bad feed lips letting extra round pop out. Mark that magazine and test it, often it’s a mag issue. Could also be weak extractor letting a fired case loose in receiver while next round feeds.
- Bolt fails to lock back on empty: If it doesn’t lock on last round, likely under-gassed or mag follower not engaging bolt catch (mag spring weak or follower worn). Try another mag first. If multiple mags, consider opening gas (if adjustable) or the rifle may just need oil/ break-in. Also check buffer spring isn’t too stiff (if you put in wrong one).
- Bolt won’t go into battery (close fully): If a round is chambered but bolt not fully rotated/closed, you can often feel it (charging handle not fully forward, gap in ejection port). Don’t fire in that state (it likely won’t anyway). Just re-cycle it. Possible causes: dirty chamber (if after many rounds or shooting steel-cased ammo which can leave lacquer), insufficient lube, or a cartridge out of spec. Clean the chamber and lube. The forward assist can be used to nudge a bolt closed in a gritty chamber, but avoid slamming rounds that clearly don’t want to chamber – could be the wrong caliber or an obstruction.
- Magazine issues: If you suspect a bad mag (lots of misfeeds with it vs others), set it aside. Common mag problems: bent feed lips, weak spring, or dirty inside. You can disassemble most mags (depress follower and slide floorplate) to clean inside and check spring/follower condition. Generally, P-Mags and USGI aluminum mags are cheap enough that if one acts up, just replace it.
- Safety/Trigger issues: On a new build, occasionally something might be misaligned. E.g., safety selector can’t flip to “Safe” when hammer is cocked – that usually means trigger not seated right or safety detent issues. Or trigger doesn’t reset (stays back after shot). If trigger fails to reset, perhaps the disconnector spring was installed upside down or not at all. That’s an assembly error; you’d need to open it up and fix that (the wider end of spring goes in trigger, we did that). If hammer is following bolt (gun doubling or not resetting), that’s disconnector issue too – intermediate fix needed (bend disconnector spring or replace if weak).
- If rifle doubles (fires more than one with one trigger press), stop using it until fixed – this is dangerous and also legally problematic (could be considered full-auto if not an intentional binary trigger). Usually, it’s hammer follow-through caused by improper trigger assembly or very soft primers slam firing.
- Sights loose or shifting: If your groups suddenly wander drastically, check sight tightness. A loose optic mount or sight can cause that. Beginner maintenance: every so often, verify screws on optics, handguard, stock, etc. are snug. The AR’s recoil is light but repeated vibrations can loosen screws if not secured with Loctite or torqued.
Spare Parts for Beginners: It’s wise to have some spare small parts because tiny springs and pins can get lost or break:
- Spare firing pin retaining pin (they’re cheap and easy to lose).
- Spare bolt cam pin (rarely breaks, but cheap insurance).
- Spare extractor with spring and pin – extractors can chip especially with lots of steel ammo. Often an extractor kit is sold with spring, insert, O-ring.
- Spare gas rings (if you shoot thousands of rounds, gas rings wear; if bolt can sit in carrier and slide out freely by gravity when extended, rings are worn – usually not for many thousands of rounds. Easy to replace and cheap).
- Spare buffer retainer and spring (in case you launched one during assembly or lose it).
- Spare detents and springs (takedown/pivot, etc.) – those things love to disappear when building, and can eventually wear or bend.
- Extra magazine springs or just extra mags.
These basics can fix 99% of wear issues for a long time. A spare complete bolt or BCG is great to have as backup – you can drop it in if something catastrophic happens to original (bolt lugs can break after many thousands of rounds or if over pressured; having a spare BCG means you troubleshoot by swapping to see if issue is bolt-related).
Cleaning Frequency: A civilian AR for range use doesn’t need to be spotless every 100 rounds. But as a beginner, it’s good to clean after each range day so you learn the rifle and keep it maintained. ARs can run many rounds suppressed or in desert without cleaning if lubed, but for longevity and detecting issues, regular cleaning is beneficial. Also, clean if going to store it for a while, to prevent corrosion (especially if shooting corrosive primers, which is rare in .223 but some imported ammo maybe, or if shooting in wet conditions).
Ammo Considerations: Steel-cased ammo (Wolf, Tula) is cheaper but often dirtier and under-powered; you might see more failures to eject or so. Brass ammo generally runs cleaner/hotter. If your rifle has trouble with one type, try a different brand/weight. Some AR barrels prefer certain bullet weights for accuracy. Beginners note: 5.56 NATO vs .223 Rem – your chamber likely is 5.56 or .223 Wylde, which handles both. Don’t use 5.56 in a .223-only chamber (pressure could be too high). If it’s 5.56 or Wylde, shoot any .223 or 5.56. Most builds nowadays are 5.56 NATO chamber.
Intermediate: Diagnosing and Fixing Deeper Issues
When basic troubleshooting isn’t enough, intermediate knowledge comes in:
- Pattern Analysis: Look at where brass is ejecting. Earlier we noted 3-4 o’clock is optimal. If consistently at 1 o’clock (forward), likely over-gassed. Cure could be heavier buffer or adjustable gas. If at 5 o’clock (dribbling back), likely under-gassed or dragging friction (check lube, check buffer isn’t too heavy).
- Inspecting Extractor and Ejector: If you have frequent extraction failures or stove pipes:
- Remove bolt, push on ejector plunger with a tool – it should depress with firm spring pressure and rebound. If it’s stuck or weak, disassemble (drive out tiny roll pin on bolt face, careful spring/ejector launch) and clean underneath, maybe replace spring.
- Extractor: Look at the claw – edges should be sharp, not chipped. Check spring – if it’s the older style small spring, consider upgrading to a Colt gold spring or Sprinco 5-coil + black insert and O-ring. That often cures extraction woes in carbines. The O-ring gives extra tension; sometimes mandatory for short barrels (like 7.5" pistol builds).
- Bolt Lock-Back Issues: If bolt won’t lock open on empty even though cycling fine otherwise, suspects:
- Gas (underpowered).
- Buffer too heavy (slowing BCG).
- Bolt catch malfunctioning (spring or catch damaged).
- Magazine followers (but if multiple mags do same, less likely).
- Test by loading one round in mag, fire – does bolt lock? If not, try a different mag. Still no – likely under-gassed. If adjustable gas, open it more. If not, maybe enlarge the gas port slightly (expert job) or lighter buffer.
- Or temporarily test with lighter buffer (H2 down to H1 or standard).
- Light Primer Strikes: If you see shallow dents in primers and no bang (and ammo is good, not hard milsurp), check hammer spring installation (the legs of spring must be on top of trigger pin, oriented correctly – if backwards, hammer hits weak). Could also be debris in firing pin channel or a too-short firing pin (rare unless it’s a weird bolt). Measure firing pin protrusion (>0.028" typically). Some bolts for 7.62x39 or 6.5 need enhanced firing pins to reach deeper primers.
- Accuracy Problems: If your groups are wildly large (like 6-8 MOA at 100) from a setup that should do maybe 2-3, examine:
- Optic/sights tightness (very common, as mentioned).
- Barrel stability: is barrel nut tight? A loose barrel nut will cause large shifts (though usually noticeable as rattling).
- Barrel quality: Some budget barrels just aren’t accurate; ammo too (try different ammo type – bullet weight etc.).
- Muzzle device strike: check bullet isn’t grazing a misaligned suppressor or a poorly threaded muzzle brake.
- Free-float vs not: if using sling on a non-free-float, sling tension can shift POI; free-float solves that.
- If using a scope, parallax or improper zero technique (e.g., parallax not adjusted, or flinching).
- Also consider shooter error – intermediate shooters might use a rest or sandbags to eliminate user input when troubleshooting mechanical accuracy.
- Cycles but Doesn’t Fire Next Round: This could be hammer follow (hammer is down on next round but no bang). That indicates disconnector issue. Perhaps disconnector spring fell out or disconnector hook not catching hammer. Replace disconnector or spring as needed.
- Unsafe (Hammer follow leading to doubles): Already mentioned – fix disconnector engagement. Possibly use a stronger disconnector spring or slightly adjust angle (gunsmith task). But usually it’s assembly error – e.g., trigger jobs gone wrong or too light hammer spring.
- Gas Block Leaks: Most low-pro blocks will leak a little carbon at first – that’s okay. But if you suspect significant leak (e.g., gas block was loose – you’d see a lot of carbon blowing out around it and likely under-gassed symptoms), you can remove handguard and inspect. If loose, realign and tighten screws, perhaps with some red high-temp threadlocker if set-screw type (unless you plan to remove often).
- Carrier Tilt (in piston systems): If you installed a piston kit and see abnormal wear marks in buffer tube (scraping at bottom), that’s carrier tilt – the piston pushing carrier causes tail to dip. Some piston systems have anti-tilt carriers. This is a niche troubleshooting for piston ARs: use an anti-tilt buffer or carrier if needed.
- Buffer Spring Issues: After thousands of cycles, buffer springs can shorten and tension reduces – might cause slightly more violent action or failure to lock back eventually. If your rifle used to work and gradually starts short stroking after many rounds, check buffer spring length (standard carbine is ~10.5” new, replace if significantly shorter or every ~5000 rounds as preventive). They’re cheap.
- Trigger Pin Walking: If you notice trigger or hammer pins moving out, ensure the J-spring in hammer is present and engaged. If using an aftermarket trigger without those, you might need anti-walk pin set (with screws or retainers). It’s an easy fix to install those.
- Preventive Parts Replacement: Intermediate users often replace the extractor spring and buffer spring on a schedule (like every 5k or if issues arise). Also, gas rings when needed – test by standing BCG on bolt face: if carrier slowly slides down under its own weight, rings are worn. Or simply every ~3000 rounds as cheap insurance. Firing pin can last a long time, but check tip for any deforming.
- Cleaning Intermediate: Perhaps incorporate copper fouling removal occasionally if accuracy declines (use a copper solvent after cleaning powder fouling, especially in precision barrels). Copper can build up in bore after a few hundred rounds, affecting accuracy slightly. But a chrome-lined carbine barrel likely doesn’t need it often (they are more forgiving; also, not benchrest accuracy to begin with).
- Storage: Store your AR in a cool, dry place. If long-term storage, consider leaving it slightly more oily or use a vapor corrosion inhibitor in the case. But wipe off excess oil before shooting (especially in barrel). If storing assembled in a safe, relieve hammer spring tension (dry fire on empty chamber or use safety/down) so hammer isn’t cocked for months – not a big deal but some like to ease springs for longevity.
Expert: Advanced Troubleshooting and Maintenance
Experts rarely run into new problems, but they have refined their process for reliability:
- Polishing & Tuning:
- Polish feed ramps or chamber if feeding issues with particular ammo (like some HP or flat nose rounds). They may use a Dremel lightly to smooth edges – careful to not overdo and change feed ramp angles.
- Polish trigger sear surfaces (if doing their own trigger job) to smooth pull, but again very cautiously to not alter geometry.
- If an AR is used in competition, an expert might lighten bolt carrier or use adjustable gas to reduce recoil, but then extensively test to ensure it’s still dependable enough (maybe not MIL-spec reliability but at least match-length reliability).
- Some experts even adjust gas by drilling an extra tiny port in barrel in some setups to vent gas earlier (rare).
- Monitoring Uncommon Failures:
- Bolt lug cracking: after tens of thousands of rounds or with lot of full-auto, bolt lugs can crack. Usually at cam pin hole or lug opposite extractor. Experts inspect bolts under magnification occasionally or replace bolt at known intervals (e.g., many replace at 10-15k rounds as cheap insurance if rifle is critical use).
- Barrel throat erosion: after many rounds, accuracy may fade as throat erodes. Experts might gauge the throat with erosion gauge or note velocity drop in chronograph (erosion leads to slight velocity loss). At some point, barrel replacement is due (chrome-lined 5.56 might go 15-20k rounds usable accuracy, stainless precision maybe 5-10k depending on care).
- Gas port erosion: very long term high-temp use could enlarge port slightly (increasing gas). If gun seems to be getting more violent ejection over time despite same ammo, maybe port erosion. Not much to do except adjust buffer or plan to replace barrel eventually.
- Receiver extension wear: If buffer detent gets beat up or the hole is oval shaped, or cam pin is peening the upper inside, these are signs of heavy use. The cam pin track in upper can wear and there’s not much you can do aside from eventual upper replacement if the cam pin is in really bad condition.
- Extreme Reliability Measures:
- Dual extractor spring (some bolts have dual springs for extraction redundancy – LMT enhanced bolt, etc. – experts might invest in those for harsh use).
- Chrome-silicon springs for longer life (some use CS buffer and hammer springs that can last longer than mil-spec).
- Coating parts: Nickel Boron or DLC coating on BCG can make cleaning easier and reduce friction when dry. Some high-end BCGs come coated; experts running suppressed or in desert like those because carbon doesn’t stick as hard.
- Using quality ammo: Experts know that cheap inconsistent ammo can cause weird issues (blown primers that jam action, etc.). They test and choose ammo that their rifle “likes” especially for serious use or matches.
- Malfunction Drills Under Stress: Experts practice clearing malfunctions until it’s muscle memory (for competition or combat). They know immediate action (“Tap, Rack”) and remedial (strip mag, clear, reinsert) for double-feeds. Also, stovepipe (just rack usually clears). They might practice using a buddy’s rifle induced jams to simulate. This isn’t maintenance per se but it ensures if something goes wrong, they fix it fast.
- Tools: Experts often have an AR-specific tool kit:
- Torque wrenches (in-lb. and ft-lb) to precisely tighten things.
- Headspace gauges (especially if swapping bolts or using unknown barrel).
- AR combo wrench, vise blocks, maybe a spare parts box at the range.
- Cleaning rod kept in gun case to knock out any stuck casing or squib (rare but critical if it happens).
- Bore borescope (some advanced shooters use endoscopes to inspect bore and gas port).
- Advanced Cleaning:
- Possibly use an ultrasonic cleaner for BCGs if they want them super clean without scraping.
- Use of specific solvents for carbon like Slip2000 Carbon Killer for bolt tail soak, etc..
- But also knowing not to over-clean – e.g., cleaning rod damage is a thing if done carelessly; many benchrest guys say more barrels ruined by cleaning than shooting. So, they use bore guides and coated rods. AR has muzzle device, but can still use guide to keep rod centered if cleaning from muzzle (though always best to clean from chamber).
- Log Keeping: Experts often log rounds fired, cleaning done, parts replaced, any malfunctions and fixes. This helps anticipate when to replace parts (like "extractor spring replaced at 5000, next by 10000" etc.) and track reliability (e.g., “500 rounds since last stoppage,” etc.). For a defensive gun, an expert wants a high confidence level (e.g., 1000 rounds with zero malfunctions on current setup).
- When to Consult a Gunsmith: Even experts sometimes hit a wall. For example, if headspace is off (too tight or too loose) – maybe the barrel extension or bolt isn’t correct. An expert might swap bolts or measure, but if it’s truly wrong, best fix is a new barrel or bolt (gunsmith could set back barrel extension, but not common for AR). Or if the upper receiver face is off square enough to cause issues, lapping it might help.
- If chamber is cut poorly (rough or tight), a gunsmith could polish or ream slightly.
- If the gas port in the barrel was drilled, misaligned (rare, but off-center port could cause some gas block misalignment issues always), maybe a larger gas block port or different block could solve.
- For most parts, ARs are straightforward, so an expert with tools can fix nearly anything by part replacement or minor fitting. But it’s good to know one’s limits (e.g., don’t try to weld or re-drill something unless you really know).
By combining diligent maintenance and the judgment of when to replace a part or tweak a system, an expert keeps their AR running in top form. AR-15s are known for reliability when properly maintained, and many issues can be preemptively avoided by using quality components and regular checks.
Before closing the troubleshooting section, a quick note on Legal/Safety: if your AR ever runs away (uncontrolled full-auto due to hammer follow or something) – stop using it and fix it. Not only is it dangerous, it’s a legal problem if someone thinks you made a machine gun. It’s almost always just a worn or misassembled fire control part – fix or replace those.
Now that you have built, tuned, and know how to maintain your AR-15, let’s compile the legal considerations we touched on into a clear appendix. The following Legal Appendix provides a state-by-state overview of compliance issues to ensure your build (and how you configure or carry it) stays on the right side of the law.
Legal Appendix: State-by-State Compliance
Gun laws in the United States vary widely by state (and even localities). This appendix outlines key legal considerations for AR-15 ownership and builds in different states. Always double-check current laws before building or modifying your AR-15, as legislation can change frequently. We provide a summary as of the time of writing (2025), focusing on AR-15 rifles (semi-automatic, magazine-fed rifles) and parts.
Below is a general state-by-state compliance chart and notes on restrictions:
- Federal Law (USA-wide):
- AR-15 rifles are legal federally as long as they are semi-automatic and have a barrel length ≥16" (otherwise it’s a Short Barreled Rifle requiring an NFA tax stamp). You must be 18+ to purchase a rifle from an FFL (21+ for lower receiver in some cases since treated as “other”).
- Building for personal use is federally legal (no serial needed) but selling a homemade firearm requires compliance (and recent rules may treat receiver blanks differently). However, by using a serialized lower from an FFL, you’re covered.
- No federal magazine capacity limit currently (the 1994-2004 ban expired). So standard 30-round mags are federally OK.
- Machine gun conversion is illegal without expensive licensing – don’t even consider any full-auto parts or devices.
- Transport: Under the Firearm Owners Protection Act, you can transport unloaded firearms through states as long as they’re legal at start and destination, and gun is locked and ammo separate. But avoid unnecessary stops in very restrictive states.
- NFA: Adding a stock to a <16" barrel = SBR (need ATF approval). Adding a vertical foregrip to <26" overall pistol = AOW (also NFA). Know these nuances if building AR pistols.
- State Restrictions Chart: (Key: “Assault weapon ban” means many AR-15s are banned or require registration/feature modifications. “Mag limit” = max magazine capacity allowed. “Other” includes age limits, license requirements, etc.)
- Alabama (AL): No state-specific AR bans or mag limits. Follows federal law. Generally permissive.
- Alaska (AK): No state AR ban or mag limit.
- Arizona (AZ): No restrictions. Very gun-friendly.
- Arkansas (AR): No specific AR restrictions.
- California (CA): Assault weapon ban in effect. Semi-auto rifles with detachable mags can’t have features like pistol grip, adjustable stock, flash hider, etc., unless registered as assault weapons from prior allowed periods. Compliance via “featureless” builds (e.g., using a fin grip, fixed stock, muzzle brake instead of flash hider) or “fixed magazine” builds (mag locked in place requiring disassembly of action to reload, e.g., using devices like Patriot Pin). Also, all firearms purchases require a Firearm Safety Certificate and registration. Must be 21 for any firearm in CA. Magazines limited to 10 rounds (there was a brief period allowing standard mags due to court case, but as of now 10 is limit pending legal battles). Building from 80% requires serialization from CA DOJ before building.
- Colorado (CO): No assault weapon ban, but magazine capacity limit of 15 rounds for rifles (since 2013). Some localities (Denver, Boulder County) have stricter rules: Denver bans all “assault weapons” (defined similar to older fed law) and mags >10. Boulder and some others had local AW bans, though state preemption is in flux. Check local laws. Otherwise, 18+ for rifles, no other special requirements.
- Connecticut (CT): Assault Weapon Ban. Specifically named models (like “Colt AR-15”) are banned and others with one-feature test (pistol grip, etc.) are banned unless owned before 1994 and registered, or before newer 2013 law update and registered. New AR-15s are not permitted unless featureless or specifically made compliant (some “others” firearms – not rifle/pistol – concept exists by adding fixed magazine or weird stock). Also need a state firearm certificate to purchase any semi-auto centerfire rifle. Magazines limited to 10 rounds (grandfathered >10 must be registered, and you can’t load >10 even if you have one). CT also bans 50oz+ weight semi-auto pistols, etc., mostly to get AK/AR pistols. Bottom line: CT is very restrictive.
- Delaware (DE): In 2022 passed a law banning assault weapons and high-cap mags. Assault Weapon Ban and magazine limit 17 rounds now. The features list is detailed – AR-15s with typical features are banned to buy/transfer; existing owners could keep with certain provisions. Also raised age to 21 for rifles as of 2022. So new builds in DE are effectively not allowed unless featureless or otherwise compliant with their law definitions (which appear to ban most semi rifles with any common features).
- Florida (FL): No assault weapon ban or mag ban statewide. However, after 2018, must be 21 to purchase any firearm (long guns included) from dealers. Private sales for 18-20 are also restricted. No registration. Florida has some preemption ensuring locals can’t ban guns generally.
- Georgia (GA): No specific state restrictions on ARs or mags.
- Hawaii (HI): Assault Pistols banned (rifles okay but pistols with certain features not). For rifles, Hawaii limits mag capacity to 10 rounds but that law is for handguns; however, they interpret law to effectively ban rifle mags >10 unless fixed to rifle? (HI law: handgun mags >10 illegal; rifle mags not mentioned except many AR mags could fit handguns like AR pistol, so they treat all AR mags >10 as prohibited). HI requires registration of firearms, and a permit to purchase. So, AR-15 rifles are legal (no feature ban for rifles), but limited to 10 rounds by mag law in practice. Also 21+ for semi-auto rifle purchase (since 2020 law).
- Idaho (ID): No restrictions; very gun-friendly.
- Illinois (IL): This one is changing. In 2023, IL passed a ban on assault weapons and mags >10 (for rifles) statewide. Law is under court challenges but as of Jan 2024 being enforced. Previously, only some local jurisdictions like Cook County (Chicago) had AW bans. Now IL law (Protect Illinois Communities Act) bans sale/possession of new assault weapons and requires registration of existing by Jan 2024. AR-15s are included, with features test or list. Magazines over 10 for rifles are banned to sell; existing >10 can be kept on private property or at range, but not carried in public after Jan 2024 (with some exceptions). Illinois also has FOID card requirement for any gun ownership, and 21+ age (or 18+ with parent FOID sponsorship) to possess firearms. So, IL is now a restrictive state for ARs unless court strikes the law down.
- Indiana (IN): No state bans. (Just federal law; very permissive).
- Iowa (IA): No state bans.
- Kansas (KS): No state bans.
- Kentucky (KY): No state bans.
- Louisiana (LA): No state bans.
- Maine (ME): No state bans.
- Maryland (MD): Assault Weapon Ban (for rifles named) since 2013 (Firearm Safety Act). They specifically ban AR-15 and variants by name (basically any semi-auto centerfire rifle that is a “copycat” of listed assault weapons is banned to purchase/transfer). However, HBAR (Heavy Barrel) AR-15s were allowed (barrel not threaded for flash hider and heavy profile). Many FFLs sell “Maryland compliant” AR rifles that are heavy barrel and no flash hider (just brake) and perhaps fixed stock. Handguns need roster approval. Also, magazines limited to 10 rounds for transfer (people cannot buy or bring in >10, but possession of older, larger mags is not criminal). You must be 21 to buy rifles that are defined as “regulated” (which includes AR-15s). MD also requires a license (Handgun Qualification License) for handguns, but not for rifles aside from the banned ones. So effectively, to have an AR in MD now, it must be an HBAR or otherwise outside their definition (or owned pre-2013).
- Massachusetts (MA): Assault Weapon Ban (mirrors federal 1994 ban but made permanent). In 2016 the Attorney General issued expanded enforcement to include “copies or duplicates” of listed guns like AR-15, effectively banning ARs by feature even if not brand name. So, AR-15s cannot be sold in MA unless they are featureless or some fixed-mag type. Pre-1994 AWs can be possessed if registered then. Magazines over 10 are banned (pre-94 grandfathered allowed). MA requires Firearm Identification (FID) or LTC license to own guns. LTC-A needed for “large capacity” rifles. Strict storage laws too.
- Michigan (MI): No assault weapon ban. One odd law: if you configure an AR as a pistol (under 26" w/o stock or with brace historically), it had to be registered as a pistol in MI. But as rifle, no registration. MI is otherwise okay with ARs; recently talking of safe storage laws but not bans.
- Minnesota (MN): No AW ban. 18+ can own rifles. Only weirdness: transferable MGs banned in MN (not relevant to semi-AR).
- Mississippi (MS): No bans.
- Missouri (MO): No bans; actually, MO prohibits local governments from regulating guns (strong preemption).
- Montana (MT): No bans.
- Nebraska (NE): No state bans.
- Nevada (NV): No AW ban or mag limit. (Note: NV in 2019 banned bump stocks after federal rule, and binary triggers may be questionable; but ARs normal are fine. Clark County used to have handgun registration but repealed now).
- New Hampshire (NH): No bans.
- New Jersey (NJ): Assault Weapon Ban (since 1990s). Only specifically allowed guns are ones that are substantially different (e.g., some NJ-compliant models come with pinned stocks, no flash hider, etc., but still many ARs are not allowed). In practice, to be NJ legal, an AR must be semi-auto, <15 round mag (NJ lowered mag limit to 10 rounds in 2018), no flash hider (muzzle brake pinned is okay), no collapsible stock (must pin it), no bayonet lug, etc. NJ has a list of banned “named” firearms and then a one-feature test for semi-auto rifles with detachable mag: can’t have pistol grip, or telescoping stock, etc. NJ law is peculiar: they list specific models (Colt AR-15 and “substantially identical” – which they interpret as any AR) unless it has none of the evil features. So, a “featureless” AR (fixed stock, no pistol grip – a Thordsen stock or similar, no flash hider, etc.) might be allowed. However, NJ also requires a Firearms ID Card to purchase long guns, and even to buy ammo. Hollow point bullets are restricted in NJ (can own, but not carry outside certain activities).
- New Mexico (NM): No bans (some pushes but none passed).
- New York (NY): Assault Weapon Ban (NY SAFE Act 2013). AR-15s must be registered if owned prior to ban or configured into compliance: compliance means either rendered “featureless” (e.g., no pistol grip – using something like a Spur grip or Thordsen stock, no flash hider, no folding stock, etc.) OR fixed magazine (like with a device that fixes mag in place, often loaded via top). Many people use the fixed-mag route (some use devices like AR MagLock) so then it's technically not a “detachable magazine” rifle so features are okay. Magazines limited to 10 rounds and technically illegal to load more than 7 in them (the 7 round part was struck down, so you can load 10). NY requires registration of “assault weapons.” Also, NY has a permit required for handguns but not for rifles (except NYC, see below). Must be 21 to buy semi-auto rifles in NY as of 2022 (new law requiring a license akin to pistol license to purchase a semi-auto rifle).
- New York City: Even stricter – no new AR-15s allowed. NYC bans rifles that hold over 5 rounds. NYC requires its own rifle/shotgun permit for any long gun. So, an AR in NYC must be extremely neutered (fixed 5-round mag and no features).
- North Carolina (NC): No AW ban. (Charlotte and Durham had some old local rules but state law preemption stops most local regs now).
- North Dakota (ND): No bans.
- Ohio (OH): No state ban. Some cities like Columbus tried mag bans but state preemption likely voids that.
- Oklahoma (OK): No bans.
- Oregon (OR): No AW ban at moment. However, Measure 114 (passed 2022, under court injunction as of 2023) would require a permit and training to purchase, and ban mags >10. If it goes into effect, 10-round mag limit and permit-to-purchase for any firearm would be needed. Right now, OR is status quo, but this could change, so check latest.
- Pennsylvania (PA): No AW ban. Philly has some local laws (like no guns in parks, etc.) but not an AW ban (state likely would preempt anyway).
- Rhode Island (RI): No AW ban (they considered it), but recently magazine limit is 10 rounds (as of 2022 law). They also require a state permit or hunter safety card to purchase any gun, and a 7-day waiting period. So ARs are legal but cannot use mags over 10 now. No feature ban, but must be 18 (or 21? RI law is 18 for long guns, but 21 for handguns).
- South Carolina (SC): No state bans.
- South Dakota (SD): No bans.
- Tennessee (TN): No bans.
- Texas (TX): No bans (Texas is very permissive).
- Utah (UT): No bans.
- Vermont (VT): No AW ban, but magazine limits: 10 rounds for rifles, 15 for pistols since 2018. They also banned bump stocks. Otherwise ARs okay, just limited to 10 round mags for your rifle. VT also has universal background check law for sales.
- Virginia (VA): No AW ban statewide (an attempt in 2020 failed). However, VA restricts how/where you can carry certain firearms: e.g., in cities like Richmond, cannot open carry a loaded semi-auto with >20 round mag, or shotgun >7 shells, etc., under certain ordinances (this stops open carry of AR with 30rd mag in those cities). But owning and transporting AR is fine. Must be 18 (21 to buy from dealer now under federal law changes possibly?). Northern VA counties have some local ordinances on transport in public spaces but nothing that bans possession.
- Washington (WA): In 2023, WA banned sale/manufacture of assault weapons. Existing owners grandfathered (possession is allowed). So, you cannot buy or import new AR-15s into WA now. Also, WA already had a magazine limit of 10 rounds effective 2022 for sales (possession grandfathered). Additionally, WA requires buyers of semi-auto rifles to be 21 and take a safety training and undergo an enhanced background check (since 2019 law). So, in summary: as of now, you can keep what you have in WA, but cannot purchase new AR-15s or similar (list is broad with features). WA's definition banned all semi-auto rifles with any military features or even by name.
- West Virginia (WV): No bans.
- Wisconsin (WI): No bans.
- Wyoming (WY): No bans.
Note on Local Laws: Some cities (like Washington D.C., which isn’t a state but has its own laws) outright ban AR-15s as “assault weapons.” D.C. prohibits most semi-auto rifles and magazines >10. Chicago (Cook County) bans them (though with IL’s new state law it’s moot, but historically Cook had an AW ban). Several Chicago suburbs had bans that are now overridden by state law as IL has its own ban. Other cities like Denver (CO) banned AWs (Denver specifically prohibits “assault weapons” which includes AR-15 unless you had it prior to moving there and registered). If traveling, always check local ordinances of your destination.
Magazine Limits Recap: States with mag capacity limits for rifles: CA (10), CO (15 statewide, 10 in some local), CT (10), DC (10), DE (17), HI (10 for handguns, effectively for rifles too), IL (10 with new law, and some cities even 10 prior), MD (10), MA (10), NJ (10), NY (10), RI (10), VT (10), WA (10).
Age Restrictions Recap: Many states now require 21 for all gun purchases: FL, CA, IL (for semi-auto rifles in practice due FOID if under 21 need parental). Some require 21 specifically for semi-auto rifles: WA, NY. Most others are 18 for rifles.
Building vs Buying Considerations: In ban states, sometimes stripped lowers are not allowed to be brought in or made into rifles. For example, MA doesn’t allow new AR builds at all effectively. CA might allow you to DROS a stripped lower as long as you either build featureless or fixed mag. Some states treat lowers as “other firearm” and if you are under 21 you might not be able to buy from an FFL due to federal or state age rules (like federal law now says 21 for “frames or receivers” from dealer). Check those conditions if you are a younger builder.
80% Lowers / Ghost Guns: By state:
- Allowed most places but requiring serialization in: CA (must serialize and register), CT (had a recent ban on un-serialized receivers, requiring them to be serialized by FFL), NJ (effectively banned, they criminalized un-serialized firearms in 2018). NY banned unfinished frames in 2022. WA banned “ghost guns” (un-serialized) too. IL’s new law also bans kits. Hawaii bans manufacture of any firearm without serial. So be cautious – many states now ban building untraceable guns. If you do an 80% lower, you may need to serialize it with a state or federal-issued number depending on state law.
- Federally, regulations in 2022 redefined 80% receiver blanks as firearms if sold with tools or instructions (i.e., kits). This is being litigated. But as builder using an 80%, you might have to apply a serial number and register if your state demands it.
Suppressors, Short Barrels, etc.: Not the main topic, but remember:
- A suppressor (silencer) is an NFA item requiring a tax stamp and paperwork in all states (except the few states that outright ban civilian suppressors). States that ban or restrict suppressors: CA, HI, IL, NY, NJ, RI, MA, DE, D.C. etc. Most free states allow them with ATF approval.
- Short Barrel Rifle (SBR): If you plan <16” barrel with stock, you need ATF Form 1 approval before building. Some states don’t allow SBRs even with federal approval (e.g., CA - they ban SBRs except Curios; NJ, NY prohibit them; HI too). Check state law before doing an SBR.
- “Other” Firearm (like a Franklin Armory Title 1 or Troy PAR): Some companies made non-semi-auto AR variants (pump action AR, straight-pull bolt AR, etc.) to comply with ban states. Those might be legal in places like CA or NJ since they’re not semi-auto.
- Pistol Braces: The ATF has issued rules treating many braced AR pistols as SBRs (subject to ongoing legal battles). As of 2025, assume that an AR pistol with a brace might be considered an unregistered SBR under federal rule, unless that rule is vacated by courts. So, either run it without brace as a bare buffer tube pistol, or register it, or convert to 16” rifle.
Transport and Carry: While owning an AR at home is one thing, carrying it loaded in public is another:
- Many states forbid loaded rifles in vehicles (e.g., CA requires rifles to be transported unloaded; TX interestingly allows rifle carry openly, but in a vehicle it must not be in reach if loaded).
- Check if you need to keep it cased. For example, IL - you need it unloaded and in a case if transporting.
- If you have a concealed handgun license, it usually doesn’t cover rifles.
- National Parks follow federal law (allowed if state allows), but you can’t discharge or hunt in them, unless defense of life. Some places like Army Corps of Engineers land ban firearms.
- During travel, always research each state on route to avoid trouble (some places like NJ, NY are notoriously harsh even if you’re passing through – though FOPA law should protect if properly stored, it’s been contentious).
Public Range Rules: Not law, but many ranges have their own rules (like “no rapid fire” or “mag limits at range to 5 rounds”). Be mindful of those so you don’t get kicked out.
Summary of Banned States (as of 2024): The states with general bans on new AR-15 style rifles (semi-auto with features) are:
CA, CT, DE, HI (for pistols, rifles okay but mag 10), IL, MD, MA, NJ, NY, (and DC). Also, WA (banned sales in 2023). Minnesota, Virginia have age restrictions but not bans (the worldpop info listing “prohibited” was partly about under-18 stuff). So about 10 states + DC ban assault weapons, consistent with RAND’s note of ten states + DC as of 2024 rand.org.
For each state, reputable industry sources and state police websites often publish summaries. For example, Brownells has a page summarizing state restrictions for shipping which we drew upon, and the World Population Review summary, and Giffords Law Center have details.
Always consult official state statutes or law guides if unsure. We recommend if you live in a restrictive state, work with compliance-oriented local gun shops – they often have “compliance kits” or products (for example, fixed mag kits for CA, or MA-compliant models). If moving states, know the laws: e.g., moving to NJ with a normal AR and 30 round mags is a big no-no (you’d need to leave those behind or modify them to 10 before moving).
This appendix cannot cover every nuance but provides a high-level. Contact your state’s Attorney General’s office or State Police firearms division for clarifications.
Sources: The above info was compiled from state statutes and summaries, industry compliance charts, and analyses by gun law organizations. For precise legal language and latest updates, see state codes or Giffords Law Center’s library or NRA-ILA state law summaries.
Glossary of Key Terms
AR-15: A semi-automatic, modular rifle originally designed by ArmaLite and popularized by Colt. “AR” stands for ArmaLite Rifle, not “assault rifle.” Civilian AR-15s are semi-automatic only (one trigger pull = one shot).
Upper Receiver: The top portion of the AR-15 that houses the bolt carrier group and interfaces with the barrel. It includes the forward assist and ejection port cover. Uppers can be flat-top (Picatinny rail) or carry handle style.
Lower Receiver: The bottom portion of the rifle, legally the firearm (has the serial number). It contains the trigger group, magazine well, and buffer tube interface. It connects to the upper via two pins.
Bolt Carrier Group (BCG): The assembly that contains the bolt, carrier, gas key, firing pin, etc.. It moves back and forth, chambering rounds and extracting spent cases. Often made of steel and typically chromed or nitride inside for lubricity.
Charging Handle: The T-shaped handle used to manually retract the bolt carrier group. Located at the rear top of the upper receiver. Used for chambering, clearing, or locking bolt back manually.
Barrel: The steel tube through which the bullet is fired. AR-15 barrels are commonly 16” for rifles (to avoid NFA), but come in 10.5”, 14.5”, 18”, 20” etc. They have rifling twist like 1:7 (1 turn in 7 inches) optimized for certain bullet weights. Chambered typically in 5.56 NATO or .223 Wylde for versatile ammo use.
Barrel Nut: A round nut that secures the barrel to the upper receiver. The gas tube passes through it. Free-float handguards often clamp onto a proprietary barrel nut.
Gas Block: A device that fits over the barrel’s gas port and directs gas into the gas tube. Gas blocks can also serve as front sight (A2 FSB) or be low-profile under a handguard.
Gas Tube: A thin tube (usually stainless) that carries hot gas from the gas block back into the upper receiver, where it enters the bolt carrier’s gas key. Length varies (pistol, carbine, mid, rifle length).
Direct Impingement: The standard AR operating system where gas is funneled through a tube directly to impact the bolt carrier, as opposed to a piston system.
Buffer (and Buffer Tube): The buffer (a weighted piece) and buffer spring reside in the buffer tube (receiver extension). They moderate the bolt’s rearward movement and then push it forward. The buffer tube also serves as the mounting point for the stock.
Stock (Buttstock): The shoulder support of the rifle. Can be fixed or adjustable (collapsible). Also houses the buffer tube if adjustable type.
Pistol Grip: The handle gripped by the shooting hand, connected to the lower receiver. AR grips are modular – many aftermarket options.
Trigger (Trigger Group / Fire Control Group): The mechanism in the lower that releases the hammer to fire. Consists of trigger, hammer, springs, disconnector, and safety selector. Mil-spec triggers are single-stage ~5-8 lbs. Aftermarket can be lighter or two-stage.
Safety Selector: Lever that when flipped to “Safe” prevents the trigger from releasing the hammer. On AR-15, standard is 2-position (Safe and Fire). Ambidextrous safeties are available.
Forward Assist: A plunger on the right side of upper used to manually push the bolt carrier fully closed if needed. Not always used, but included on mil-spec uppers (except some slick-sides).
Ejection Port Cover (Dust Cover): A hinged cover that closes over the ejection port to keep debris out. It automatically opens when the bolt carrier moves back (like on first shot).
Muzzle Device: An attachment at the muzzle. Flash hider reduces flash signature, muzzle brake/compensator reduces recoil or muzzle rise by redirecting gases. Some are hybrids. Attached typically via threads (1/2x28 for AR-15).
Aperture Sights: Iron sights with a rear peephole (aperture) and front post. AR-15 uses this (rear sight in carry handle or flip-up, front post on FSB). Provides a long sight radius and precise aiming when used correctly.
Co-Witness: Alignment of iron sights with a red dot sight. “Absolute co-witness” means red dot’s point is directly on the iron sight alignment. “Lower 1/3 co-witness” means irons appear in lower third of optic window, requiring a slight head shift to use them.
Zero: The process/distance at which sights or optic are adjusted so point of aim = point of impact. Common zeros: 50 yards (for 50/200 yard crossover), 100 yards, etc. Once zeroed, you adjust aim for other distances (holdovers).
MOA (Minute of Angle): A unit for measuring accuracy/spread and adjustments. 1 MOA ≈ 1.047” at 100 yards (often just call it 1” at 100y). Used for grouping size (e.g., 2 MOA group ~2” at 100y) and scope adjustments (e.g., 1 click = 0.5 MOA).
FTE / FTF / etc.: Failure to Eject, Failure to Feed, shorthand for malfunctions. FTE could be stove-pipe. FTF could mean Failure to Fire (misfire) or Failure to Feed (double feed etc., context matters). Also “double feed” – two rounds jammed; “stovepipe” – case stuck in ejection port.
Staking: Peening metal to secure a fastener. On AR-15, gas key screws are staked so they don’t loosen. Castle nuts on buffer tube are often staked into end plate.
Headspace: The distance between the bolt face and the chamber shoulder when a round is chambered. Proper headspace ensures the cartridge is seated correctly – not too tight (could cause over-pressure) or too loose (case might rupture or misfire). Gauges (GO, NO-GO) are used to check.
Dry Fire: Practice of firing the weapon without ammo (letting hammer drop on an empty chamber). Generally safe on AR-15 (centerfire guns handle it fine). Good for training trigger pull, but ensure firearm is unloaded!
Bore Snake: A flexible pull-through cleaning “snake” that has integrated brushes and floss area. Handy for quick bore cleaning without a rod.
CLP: Cleaner, Lubricant, Protectant – a type of all-in-one gun care liquid used by the military (e.g., Break-Free CLP). Okay for basic maintenance, though some prefer specialized cleaners and separate oil.
Mil-Spec: Short for military specification. In AR context, parts that meet the standard dimensions and coating etc. Many commercial parts are “mil-spec” or “mil-spec compatible.” E.g., buffer tube sizes (mil-spec vs commercial diameter).
Free-Float Handguard: A fore-end that attaches only at the barrel nut and does not touch the barrel along its length. Improves accuracy by not deflecting barrel when rested or slung. Versus older style where handguard was held by delta ring and FSB, touching barrel.
Delta Ring: A triangular spring-loaded collar on older ARs that held the two-piece handguards in place, located just in front of the receiver.
Feed Ramps: Ramped cuts at the barrel extension (and sometimes matching cuts in upper) that guide rounds into chamber. M4 feedramps (cut into both barrel extension and receiver) are standard on modern ARs for reliable feeding, especially with fast cycling.
Bolt Carrier Tilt: An issue mostly in some piston ARs where the carrier; lacking gas tube alignment, tilts and the rear of carrier can scrape inside buffer tube. Can cause wear on lower/buffer tube.
Slam Fire: An unintended discharge when a round is chambered, due to firing pin hitting primer with enough force (could be from a stuck firing pin or very soft primer). AR-15 firing pin does lightly tap primer when chambering (you’ll see tiny dimple on ejected live round) but normally not enough to fire. Using proper primers (not overly sensitive ones) and ensuring firing pin moves freely avoids slamfires.
Battlesight Zero (BZO): A military term for a zero that allows aiming center of mass and getting hits within a certain envelope without further adjustment. For M4, usually 300m BZO (using smaller aperture, 25m zero target yields 300m zero). Many prefer a 50/200 for civilian use as a practical battlesight zero.
Trigger Reset: The point at which after firing, releasing the trigger allows it to reset and be ready to fire again (you often can hear/feel a click). Training to use short reset can improve rapid fire accuracy.
OAL (Overall Length): Total length of the firearm from butt to muzzle. Important for certain legal thresholds (pistols vs rifles; also >26” rule for unrestricted configure). Many states measure with stock extended if collapsible.
FFL: Federal Firearms Licensee – a gun dealer or manufacturer. You need an FFL to buy a serialized lower receiver (unless via private sale in free states). They handle background checks (NICS). Also, FFL needed to ship firearms interstate etc.
FOID / Firearms ID: Some states (IL, NJ, etc.) have ID cards for gun ownership or purchase. E.g., IL FOID, NJ FPID. You must have these to legally possess (IL) or buy (NJ).
Binary Trigger: An aftermarket trigger that fires one round on pull and one on release. Considered a simulated full-auto by some states, illegal in e.g., FL, NJ, etc.. ATF currently doesn’t classify it as machine gun but that could change. These can increase rate of fire but require training to control (and careful legal use).
Squib Load: A cartridge that fires with too little force, lodging bullet in barrel. Very dangerous if another round is fired after. If you ever get a “pop” with no recoil and see smoke, stop – clear gun and check barrel for obstruction.
This glossary should help clarify terminology used throughout the guide and in the AR-15 community. If you encounter unfamiliar terms beyond these, consult the AR-15 forums or manufacturer FAQs – there’s a wealth of knowledge out there and a community happy to help new builders. Always keep learning; even experts continue to pick up tips and nuances about this versatile platform.
Conclusion
Building your first AR-15 can be an immensely rewarding experience. You end up with not only a customized rifle suited to your preferences and budget, but also a deeper understanding of how it functions and how to troubleshoot it. We’ve gone beyond the basics to provide detail for all skill levels, but remember that the learning process continues on the range. Take your new build out, zero it, practice with it, and refine it as needed. The AR-15’s biggest advantage is its modularity – you can always upgrade a part or swap an upper to have a new rifle for a different purpose.
By following this guide, using quality parts, and adhering to safety and legal guidelines, you’ll have a reliable and accurate AR-15 to enjoy for years to come. Welcome to the builder’s club, and happy shooting!
References: The information in this eBook was drawn from a range of reputable sources: official military manuals, industry expert guides (Brownells, Aero Precision, BCM, WingTactical), gunsmithing resources, and state law summaries. All efforts were made to ensure accuracy and clarity. Always observe firearm safety rules and consult professionals if in doubt during your build. Enjoy your DIY AR-15 journey!
Contact info@ammojo.com if you would like a PDF version of this blog.